
You've just seated a custom Rapid Palatal Expander, but two weeks later, the patient returns with zero expansion because the parents "couldn't find the hole" or were too nervous to complete the turn. It's a frustrating reality for any clinician; our mechanical success often rests in the hands of a caregiver and a small metal key. We understand that managing these chairside variables is just as vital as the precision of the appliance itself.
This guide offers detailed RPE activation instructions for clinicians to help you master the protocol and ensure predictable results every time. You'll learn how to standardize your delivery process, troubleshoot mechanical issues in the chair, and provide parents with the confidence they need to succeed at home. We'll also explore how to minimize common setbacks like soft tissue impingement and mechanical stalls. By refining your approach to activation and communication, you can reduce emergency appointments and keep your treatment plans on schedule. Whether you're using traditional methods or moving toward a digital workflow, these steps will help you bridge the gap between mechanical activation and biological response.
Key Takeaways
- Differentiate between dental tipping and true skeletal expansion to ensure your treatment goals align with biological responses.
- Establish a reliable baseline with standardized RPE activation instructions for clinicians, including specific titration schedules for varied patient needs.
- Master chairside troubleshooting for mechanical setbacks like jammed expansion screws or the common back-turning phenomenon.
- Improve home-care success by utilizing the "Teach-Back" method and helping parents identify the midline diastema as a positive marker of progress.
- Understand how meticulous lab precision and high-torque screw selection prevent appliance rocking and ensure mechanical stability throughout treatment.
The Clinical Mechanics of Rapid Palatal Expansion
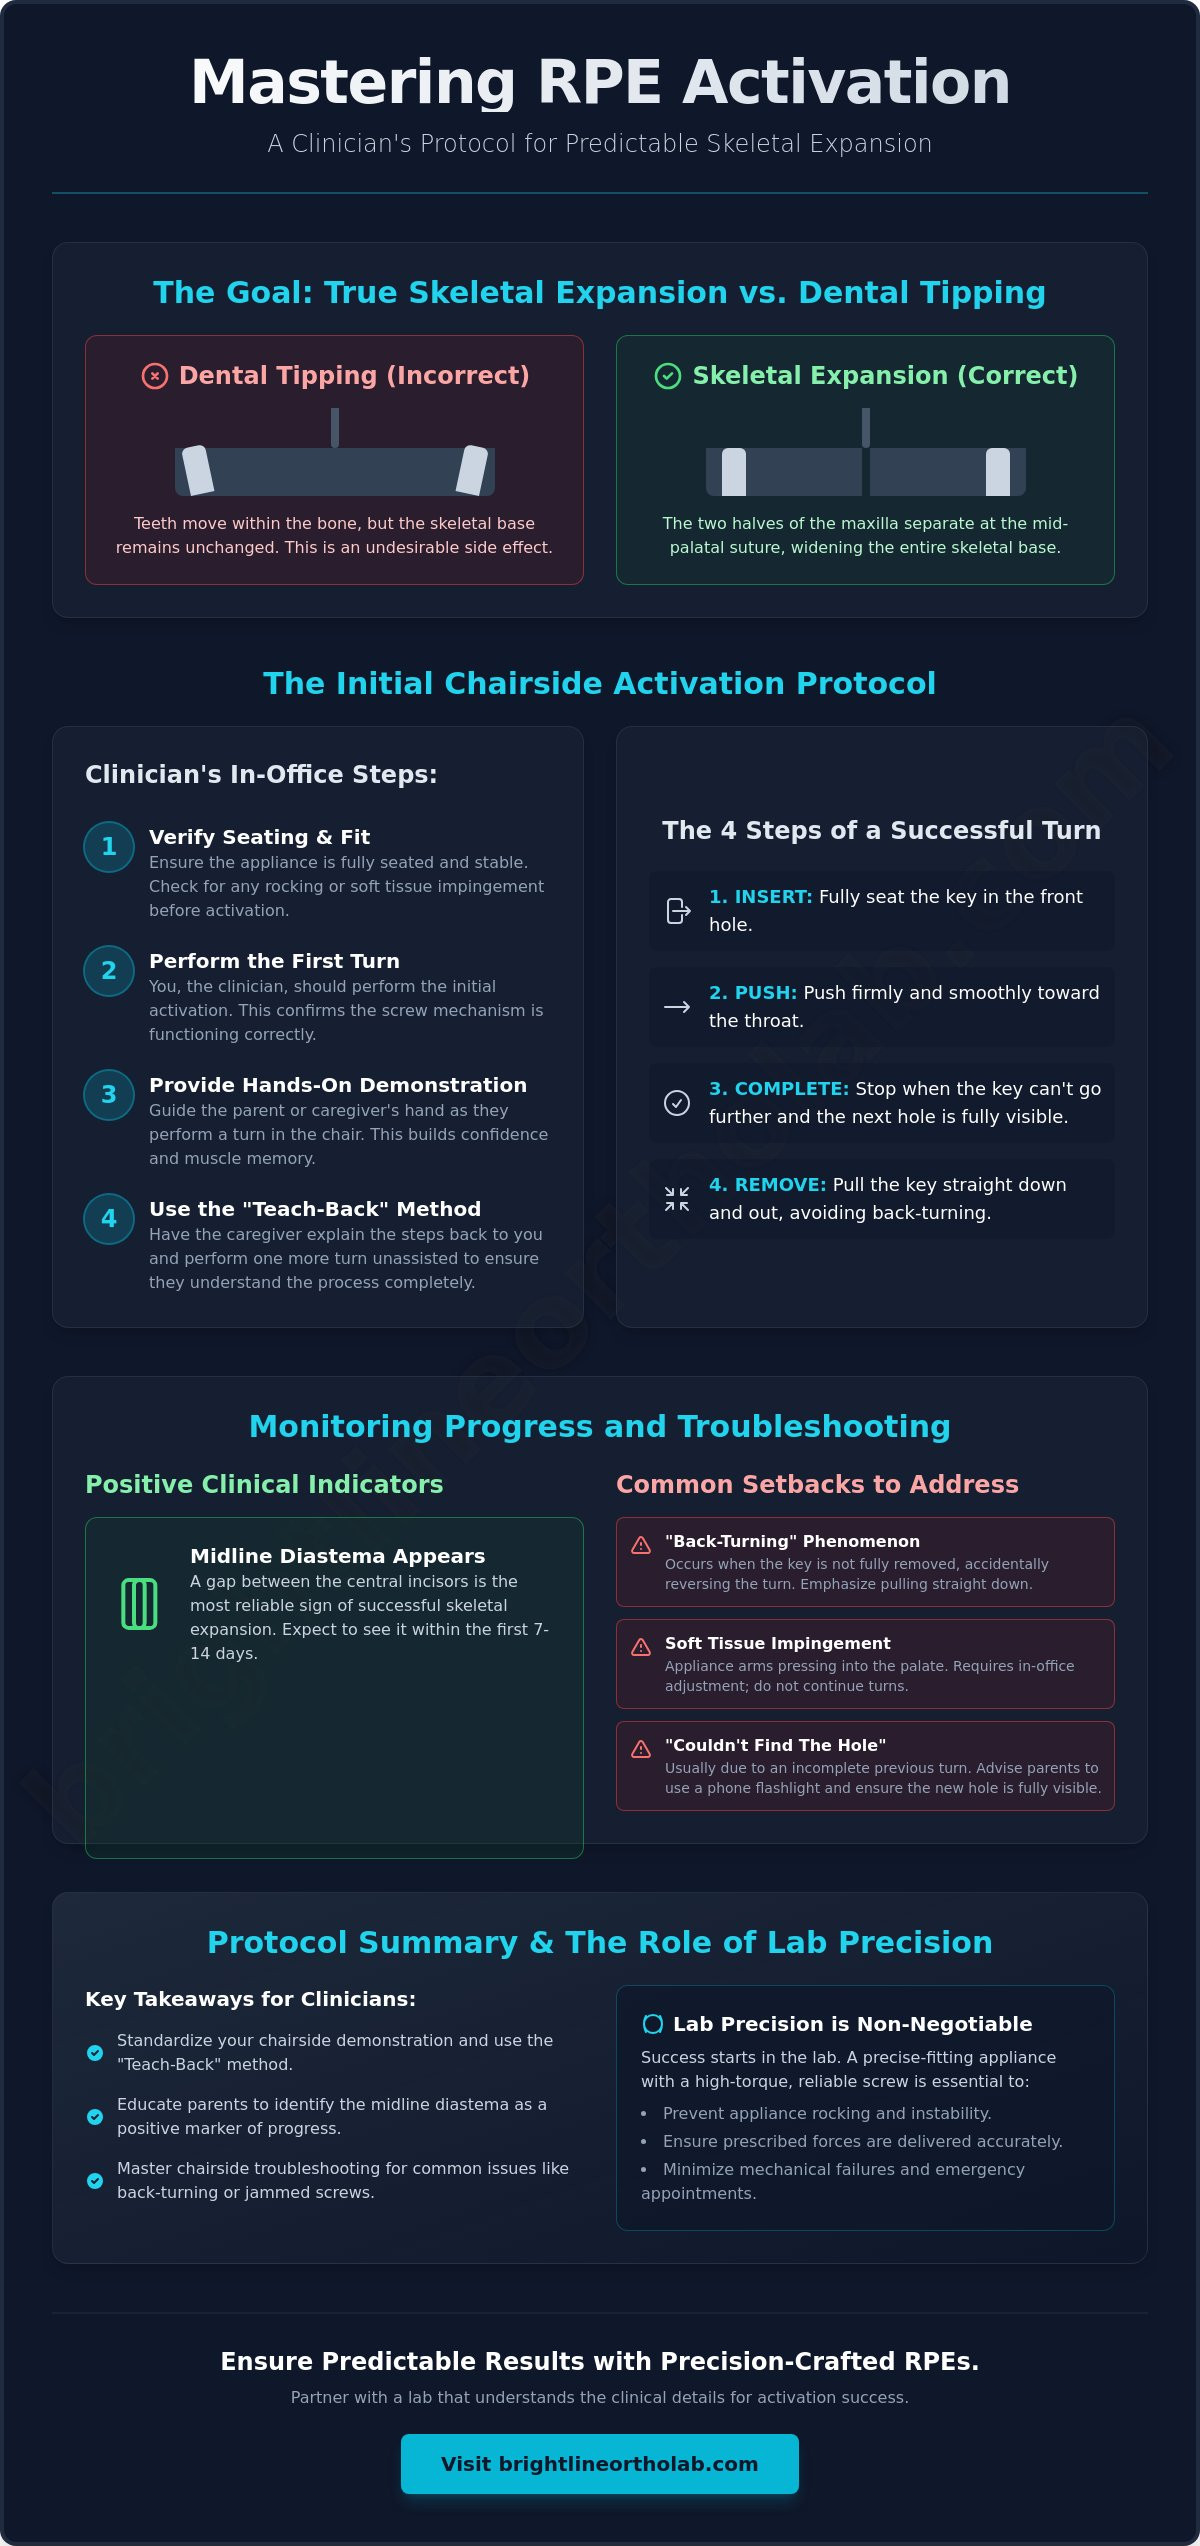
Success with a Rapid Palatal Expander starts with a clear understanding of the biological architecture you're working to remodel. While the appliance itself is mechanical, the result is purely physiological. When you provide RPE activation instructions for clinicians to your staff or follow them yourself, the goal is to apply enough force to overcome the resistance of the circummaxillary sutures without causing excessive dental tipping. This distinction is vital. Skeletal expansion involves the physical separation of the two halves of the maxilla, whereas tipping merely moves the teeth within the alveolar bone. Precision in your initial assessment ensures you aren't just moving teeth, but truly widening the skeletal base of the patient.
The expansion screw is the engine of this process, delivering high-level orthopedic forces that are transmitted through the teeth to the underlying bone. For a detailed Palatal expansion overview, you can see how different expansion rates affect the suture differently. A banded RPE provides direct force to the molars, while a bonded RPE distributes that force across the occlusal surfaces. This distribution can be helpful for managing vertical dimensions in hyperdivergent patients. Consistent force delivery from a high-quality screw is what makes this expansion predictable and minimizes the risk of mechanical failure during the active phase of treatment.
Physiological Response to Activation
The initial activations of the screw create tension within the suture. This pressure doesn't result in immediate bone movement. Instead, it builds potential energy that eventually overcomes the interlocking nature of the mid-palatal suture. Once the suture separates, the body begins a meticulous process of bone deposition to fill the gap. The lag phase is the specific interval during treatment when the mechanical screw has been turned but the biological threshold for suture separation has not yet been reached. Understanding this delay helps you manage patient expectations during the first few days of treatment.
Identifying the Ideal Expansion Window
Timing is everything. Maxillary expansion is most predictable in patients before the mid-palatal suture begins to heavily interdigitate. The American Association of Orthodontists recommends a child's first evaluation by age 7 to identify these needs early. You can monitor progress through occlusal radiographs, looking for the classic radiolucency at the midline. When providing RPE activation instructions for clinicians, always emphasize that age-related suture patency is the primary factor in skeletal success. Understanding how RPE appliances work helps you communicate these timelines to parents, ensuring they understand why early intervention is the most effective path forward for their child.
Standardized RPE Activation Protocols for Clinicians
Establishing a clear baseline starts with the very first turn in your chair. While the mechanics of the appliance are straightforward, the way you deliver RPE activation instructions for clinicians and their staff can determine the entire trajectory of the case. We've found that performing the initial activation yourself serves two purposes: it verifies the appliance is seated correctly and provides an immediate, hands-on demonstration for the caregiver. This first turn is your opportunity to set the standard for what a successful activation looks and feels like.
Documentation is just as critical as the activation itself. In your clinical record, track the number of turns completed at each visit and note the appearance of the midline diastema. This gap is the most reliable clinical indicator that you've achieved skeletal separation rather than just dental tipping. If you don't see this marker within the first week of a rapid protocol, it's time to re-evaluate the patient's compliance or the appliance's fit. Choosing a high-quality Rapid Palatal Expander from a laboratory that prioritizes precision can help ensure that the forces you're prescribing are delivered exactly as intended.
The Initial Chairside Demonstration
Success at home depends on the parent's ability to mirror your technique. Start by ensuring the activation key is fully seated in the anterior hole before applying pressure. Instruct the parent to push the key firmly toward the throat in a smooth, continuous motion until the next hole becomes completely visible at the front. If the key is pulled out before the full 90-degree rotation is finished, the next hole will remain partially obscured, making subsequent turns impossible. Always have the parent perform a "practice turn" in the chair under your supervision to confirm they've mastered the depth and direction required.
Customizing the Titration Schedule
Titration isn't a one-size-fits-all process. A standard rapid protocol often involves two turns per day, one in the morning and one in the evening, to maximize orthopedic force. However, for patients with less severe constriction or those who experience significant initial discomfort, a semi-rapid protocol of one turn per day may be more appropriate. It's vital to monitor the buccal segments closely. If you notice excessive buccal tipping or gingival recession, pause activation immediately to allow for biological adaptation. In cases involving late adolescents or skeletally mature adults, traditional expansion might not be sufficient; these patients may require Surgically Assisted RPE to achieve widening without compromising the periodontium.
Clinical Troubleshooting of Mechanical and Soft Tissue Issues
Even with the most detailed RPE activation instructions for clinicians, mechanical hurdles can arise mid-treatment. The most common call from a concerned parent is that the screw "won't turn" or that the hole has "disappeared." Often, this is the result of the back-turning phenomenon. This happens when the parent completes a turn but accidentally pulls the key forward while removing it, which rotates the screw slightly backward and obscures the next hole. To fix this chairside, you must find the partially visible hole at the posterior of the screw and complete the previous turn to reset the mechanism. Teaching parents to remove the key with a straight downward motion toward the tongue, rather than pulling it forward, prevents this cycle of frustration.
Loose bands or bond failures also require immediate attention to prevent asymmetrical expansion or dental tipping. If an appliance rocks during activation, the force is no longer being distributed orthopedically. Remove the appliance, clear away any old cement, and check the fit of the bands. If the fit is still precise, re-cement the appliance using a high-strength glass ionomer. In cases where the appliance was distorted due to trauma or improper activation technique, a new 3D printed model and an appliance remake may be necessary to ensure the expansion remains on track.
Mechanical Failures of the Expansion Screw
Differentiating between a stripped screw and a partial turn blockage is essential for efficient chairside management. A stripped screw will spin freely without moving the expansion arms; this is a rare manufacturing defect that usually requires a full replacement. However, a jammed screw is more likely caused by a partial turn or accumulated food debris. Use a high-pressure air and water syringe to clear the screw mechanism. If the screw still feels blocked, try to "back-turn" the screw one full rotation to clear the internal threads before attempting to advance it again. Most mechanical issues are resolved by simply finding the true "starting point" of the current turn.
Soft Tissue Management and Patient Comfort
Patient comfort is a major driver of compliance. While some pressure is expected during the first week of activation, actual soft tissue impingement is a clinical concern. Check the distance between the appliance body and the palatal mucosa; if the tissue is blanching or appearing inflamed, you may need to adjust the appliance or pause activation. Encourage patients to use a warm salt water rinse to soothe minor irritation. Clearing food debris is also vital for tissue health. Instruct the family to use a water flosser or a soft-bristled brush to clean under the screw daily. This prevents the localized gingivitis that often leads to palatal swelling and makes activation painful for the child.
Optimizing Patient Compliance through Education
Patient compliance is the variable that can either streamline your workflow or create a bottleneck of emergency visits. While providing RPE activation instructions for clinicians is the first step, the second is ensuring the caregiver can actually execute those instructions under pressure at home. We recommend the 'Teach-Back' method for every new case. Don't just demonstrate the activation; have the parent perform a full turn in the chair while you observe. This verifies their technique. It’s the only way to confirm they've mastered the 90-degree turn and the correct removal of the key before they leave your office.
Visual markers are powerful tools for maintaining parental motivation during the active phase. Reframe the development of the midline diastema as a "success marker" rather than an aesthetic issue. Explain that this gap is the clearest sign that the appliance is working exactly as intended. To help families stay organized, provide a physical turn-log. A simple calendar where they can check off each morning and evening turn reduces confusion and gives you a clear record to review at follow-up appointments. If you want to provide your patients with the most reliable hardware for this process, you can trust our precision-crafted Rapid Palatal Expanders to perform consistently.
Communicating the 'Why' of Expansion
Parents are more likely to stay compliant when they understand the long-term benefits of the treatment. Explain how expansion creates the necessary space for permanent tooth eruption, which often reduces the need for future extractions. Address the temporary speech changes and excess salivation early. Let them know that the "slushy" speech and extra saliva usually resolve within 48 to 72 hours as the tongue adapts to the appliance. Reassuring them that these issues are transient helps lower their anxiety and prevents unnecessary phone calls to your front desk.
The Clinician's Checklist for Discharge
Before the patient leaves, run through a final checklist to minimize logistical stress for both your team and the family. Standardizing your RPE activation instructions for clinicians within your practice ensures that every family receives a consistent, supportive message. Verify that the parent has their activation key and a backup if possible. Set a clear emergency protocol: if they miss a turn or the hole "disappears," they should stop and call the office rather than forcing the key. We recommend scheduling the first follow-up for a one-week check-in to catch any minor technique errors early.
The Role of Lab Precision in Activation Success
Clinical success with palatal expansion relies on more than just the biological response; it depends heavily on the mechanical integrity of the appliance itself. Even the most meticulous RPE activation instructions for clinicians can fail if the hardware is prone to rocking or instability. A precise band fit is the foundation of this stability. If the bands aren't perfectly contoured to the anatomy of the molars, the appliance will micro-move during each turn. This movement absorbs a portion of the activation force that should be directed toward the mid-palatal suture, leading to dental tipping rather than the true skeletal widening you're aiming for.
High-torque expansion screws play a significant role in preventing the mechanical setbacks we discussed earlier, such as the back-turning phenomenon. These precision-engineered screws provide enough internal resistance to stay exactly where the parent leaves them after a turn. This resistance is vital for maintaining the progress made during each titration. When you partner with a laboratory that prioritizes these high-quality components, you're essentially building a safeguard into your treatment plan. Choosing a digital workflow further enhances this precision. By utilizing 3D printed models, we ensure that every appliance is fabricated with a level of accuracy that traditional stone models simply can't match.
Why Fabrication Matters for Activation
The physical placement of the screw within the palatal vault determines how easily a parent can follow your guidance. If the screw is tucked too high into a narrow vault, key access becomes nearly impossible for a non-professional. We align the screw to ensure the anterior hole is always visible and accessible for the parent. Proper orientation is equally important. We verify that every screw is set to rotate in the standard "toward the throat" direction, which simplifies the learning curve for the family. If the patient has a particularly shallow or small palate, we customize the screw size to prevent soft tissue impingement while maintaining maximum expansion potential.
Streamlining Your RPE Workflow with Brightline Orthodontic Lab
Our goal is to act as a seamless extension of your clinical team. We understand that your chairside time is valuable, so we focus on a fabrication process that minimizes the need for adjustments during delivery. To get the best results, ensure your intraoral scans or impressions capture the full depth of the palatal vault and the entire clinical crown of the anchor teeth. This level of detail allows us to create a Rapid Palatal Expander that seats firmly and functions predictably from the first turn to the last. If you're looking to upgrade your appliance quality or want to discuss a complex case, contact our team for a custom RPE consultation. We're here to support your practice with the precision and reliability your patients deserve.
Standardizing Your Path to Predictable Expansion
Success in palatal expansion isn't just about the mechanical turn; it's about the synthesis of clinical protocol, caregiver education, and appliance precision. When you follow these RPE activation instructions for clinicians, you bridge the gap between initial chairside delivery and successful skeletal separation. We've reviewed how consistent titration and early identification of the midline diastema prevent the common frustrations of dental tipping or mechanical stalls. By refining your approach to both the patient and the parent, you create a more efficient workflow that keeps your treatment plans on schedule.
With over 18 years of industry experience, our US-based team focuses on meticulous craftsmanship for every custom-made orthodontic expander we produce. We understand that your chairside time is valuable, which is why we design our appliances for maximum stability and ease of access. Partner with Brightline Orthodontic Lab for precision-engineered RPEs that simplify your clinical workflow. We're here to serve as an extension of your team, providing the reliable hardware you need to achieve predictable results and supportive patient experiences every day.
Frequently Asked Questions
What should I do if the RPE screw appears to be back-turning?
If the screw appears to be back-turning, you must locate the partially visible hole at the posterior of the screw and complete the previous turn to reset the starting position. This issue usually stems from the parent pulling the key forward upon removal rather than straight downward. Once you've reset the screw, review the proper removal technique with the family to ensure the next hole remains fully visible at the anterior.
How many turns per day are recommended for a standard RPE protocol?
A standard rapid protocol typically calls for two turns per day, one in the morning and one in the evening, to apply consistent orthopedic force. For cases where the patient is particularly sensitive or the constriction is minor, a semi-rapid protocol of one turn per day is often sufficient. Always tailor the schedule to the specific biological response and the patient's comfort level during the first week of treatment.
What is the clinical significance of a diastema not appearing after a week of turns?
The absence of a midline diastema after seven days of active turns suggests that skeletal separation hasn't occurred. This could be due to dental tipping, a fused suture, or patient non-compliance. If you don't see this gap, re-verify the RPE activation instructions for clinicians with the family and check for appliance stability to ensure forces are reaching the bone rather than just moving the teeth.
How do I manage a patient who experiences significant pain during activation?
Significant pain during activation usually indicates either soft tissue impingement or a need for a slower titration schedule. Inspect the palatal mucosa for blanching or inflammation where the appliance body meets the tissue. If the appliance fit is correct, advise the patient to pause turns for 24 hours and use a warm salt water rinse to soothe the area before resuming a slower schedule.
Can an RPE be reactivated if the patient missed several days of turns?
You can reactivate an RPE after missed turns, but you shouldn't attempt to "catch up" by performing multiple turns in a single day. Have the patient return to the office to verify the appliance still fits precisely and hasn't distorted. Once fit is confirmed, simply resume the original schedule from the current screw position to avoid overloading the periodontium or causing unnecessary discomfort.
How do I verify that the parent is completing the full turn correctly?
Verification of proper technique is best achieved through a hands-on demonstration during the delivery appointment. Ask the parent to perform a full turn in the chair while you watch their hand placement and the rotation of the screw. This is the most effective way to provide RPE activation instructions for clinicians and their staff while ensuring the family feels confident and competent at home.
What are the contraindications for rapid palatal expansion in older adolescents?
Contraindications for traditional RPE in older adolescents include a fully interdigitated mid-palatal suture and significant periodontal recession. In these patients, the resistance of the circummaxillary sutures often leads to excessive buccal tipping rather than skeletal widening. For these cases, consider bone-anchored expansion or surgically assisted methods to achieve the desired maxillary width without compromising the health of the supporting bone.
Is there a difference in activation protocols for banded vs. bonded RPEs?
The activation protocols for banded and bonded RPEs are generally identical, though bonded appliances require more frequent monitoring of the vertical dimension. Because bonded RPEs cover the occlusal surfaces, they can have a "bite-block" effect that might influence the patient's bite during the active phase. Regardless of the appliance type, the goal remains a smooth 90-degree rotation of the expansion screw to deliver consistent orthopedic force.