
The most challenging patient in your chair isn't always the one with the most complex malocclusion. It's the child whose dental anatomy changes every few weeks as primary teeth exfoliate and permanent successors struggle to find their place. You've likely felt the frustration of an appliance that fits perfectly at delivery, only to become unstable a month later because a key anchor tooth is gone. Mastering appliance design for mixed dentition requires more than a standard setup; it demands a strategy that anticipates growth and accommodates the natural transition of the arch.
We understand that managing these transitional phases often leads to increased chair time and patient discomfort if the appliance isn't built to evolve. This reference guide helps you master the technical nuances of designing orthodontic appliances that maintain stable anchorage without interfering with eruption. You'll learn how to utilize 3D printed models and strategic acrylic relief to ensure a precise fit throughout the entire transition. We'll explore how to future-proof your designs using the latest digital workflows, reducing the need for constant adjustments and supporting proper arch development from the start.
Key Takeaways
- Understand the three stages of mixed dentition to better predict tooth movement and maintain consistent appliance stability throughout treatment.
- Identify the most effective clasping strategies for short primary crowns to ensure reliable retention and reduce chairside adjustments.
- Compare banded and bonded Rapid Palatal Expanders (RPE) to select the most stable anchorage solution for the developing arch.
- Master the technical nuances of appliance design for mixed dentition to prevent eruptive interference and allow for natural tooth exfoliation.
- Improve clinical outcomes by refining your lab prescriptions and utilizing digital workflows to capture complex transitional anatomy with precision.
Fundamentals of Appliance Design for Mixed Dentition
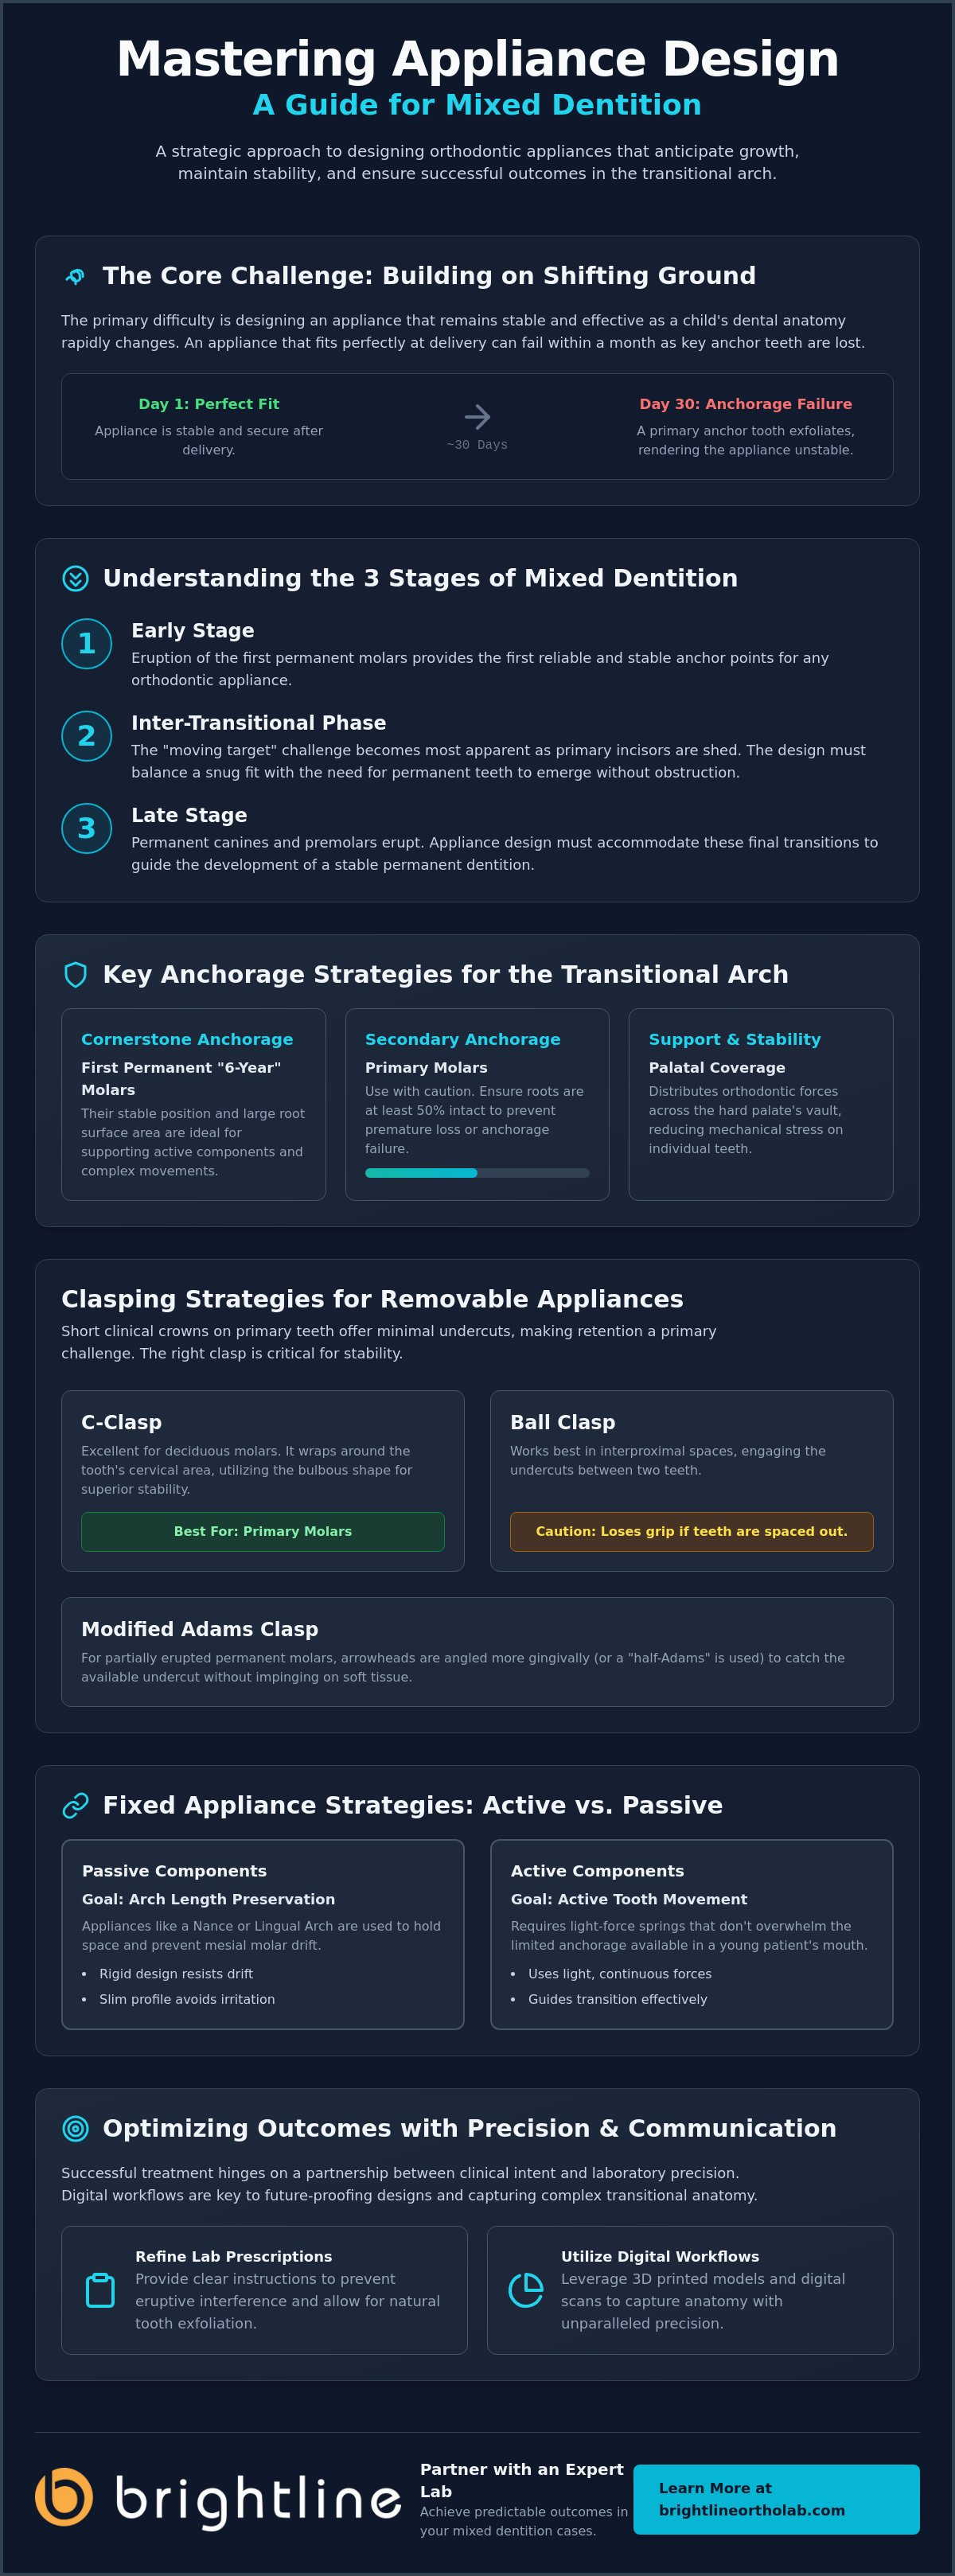
Designing for the transitional arch is like building on shifting ground. You aren't just moving teeth; you're managing a biological timeline where the landscape changes every few months. Successful appliance design for mixed dentition requires a deep understanding of the Fundamentals of Mixed Dentition to ensure your treatment plan remains effective as primary teeth exfoliate. We view this process as a partnership between clinical intent and laboratory precision, where the goal is to create a stable environment for permanent successors.
The three distinct stages of mixed dentition dictate your design boundaries. In the early stage, the eruption of the first permanent molars provides your first reliable anchor points. During the inter-transitional phase, the "moving target" challenge becomes most apparent as primary incisors shed. You must balance the need for a snug, stable fit with the physiological requirement for permanent teeth to emerge without obstruction. If the appliance is too rigid or covers areas where eruption is imminent, it can lead to delays or ectopic positioning.
Biological considerations for primary tooth root resorption are equally vital. Applying orthodontic force to a primary molar with significant resorption can lead to premature tooth loss or a complete failure of anchorage. We meticulously evaluate the dental age of the patient to determine which teeth can withstand the load. Identifying optimal anchorage teeth usually means prioritizing the first permanent molars, as they offer the root surface area needed for complex movements.
Anchorage Strategies in the Transitional Arch
The "6-year molars" are the cornerstone of any mixed dentition appliance. Their stable position allows for the use of more active components without sacrificing the overall fit. While primary molars can serve as secondary anchorage points, they should only be used if their roots are at least half intact. To further stabilize the appliance, we often recommend palatal coverage. By distributing force across the hard palate's vault, you reduce the mechanical stress on individual teeth and ensure the appliance stays seated during function.
Balancing Active vs. Passive Components
Deciding between active springs and passive space maintainers depends on your specific goals for the Leeway Space. If you're focused on arch length preservation, a passive Nance or Lingual Arch is often the best choice. These designs must be rigid enough to resist mesial molar drift while remaining slim enough to avoid soft tissue irritation. When active movement is required, we use light-force springs that don't overwhelmed the limited anchorage available in a young patient's mouth. Managing these components with precision helps you guide the transition to a healthy permanent dentition.
Removable Appliance Architecture: Clasping and Retention
Retention in the mixed arch is notoriously difficult. Short clinical crowns offer minimal undercuts, making it hard for standard hardware to stay seated. Effective appliance design for mixed dentition hinges on selecting clasping that grips firmly without interfering with the gingiva or erupting successors. We focus on creating a balance where the appliance feels secure for the patient but remains easy for you to adjust during follow-up visits.
For primary teeth, the choice often comes down to the C-clasp versus the Ball clasp. The C-clasp is excellent for deciduous molars because it wraps around the cervical area, utilizing the bulbous shape of the tooth for stability. In contrast, Ball clasps work best in the interproximal spaces. However, you must ensure there is enough contact point between the teeth to hold the ball in place. If the teeth are spacing out due to arch expansion, the Ball clasp may lose its effectiveness. Addressing these Orthodontic Challenges in Mixed Dentition requires a proactive approach to clasp selection that anticipates these dental shifts.
When permanent molars are only partially erupted, the standard Adams clasp requires modification. We often angle the arrowheads more gingivally or use a "half-Adams" design to catch the available undercut without impinging on the soft tissue. For the baseplate, we recommend thinning the palatal acrylic to improve speech and comfort. We maintain strength by reinforcing high-stress areas, ensuring the appliance doesn't flex or fracture during use. You can also utilize customized Hawley retainers as transitional maintainers, providing a versatile platform that holds space while allowing for minor tooth guidance.
Optimal Clasp Selection for Primary Dentition
We typically use .028" stainless steel wire for Adams clasps on primary second molars. This gauge provides the necessary flexibility to navigate the unique anatomy of deciduous teeth while maintaining enough "spring" for retention. For anterior stability, the Southend clasp is a reliable ally. It follows the incisal edges of the central incisors, offering excellent vertical retention that helps prevent the appliance from dropping at the front during speech.
Labial Bow Variations for Mixed Dentition
The choice between a "Short Bow" and a "Long Bow" depends on which teeth you need to control. A short bow, extending only to the lateral incisors, is often better for mixed arches because it avoids the erupting cuspids. If you use a long bow, we place the adjustment loops carefully to ensure they don't sit directly over a canine that is about to emerge. We prefer acrylic-retained wire components for these designs as they offer a cleaner profile and easier chairside modification. If you need help determining the best wire configuration for a complex case, our team is ready to support your clinical goals with expert lab consultations.
Fixed Appliance Strategies: Expansion and Anchorage
Fixed appliances offer the 3D control and skeletal impact that removable options sometimes lack. In discussing appliance design for mixed dentition, fixed strategies often center on managing the transverse dimension and preserving arch length before the full permanent dentition arrives. These appliances stay in place, removing the variable of patient compliance while providing the rigid anchorage necessary for orthopedic changes. We find that this reliability is especially helpful for young patients who may struggle with the responsibility of a removable plate.
Designing Rapid Palatal Expanders (RPE) for the mixed arch requires a choice between banded and bonded configurations. Banded RPEs are the standard when the first permanent molars are fully erupted and stable. If you're relying on primary teeth for anchorage, a bonded RPE is often the superior choice. The acrylic occlusal coverage protects the delicate primary enamel and prevents unwanted tipping of teeth with shorter roots. It also acts as a temporary bite block, which can be helpful in correcting crossbites with a functional shift.
The 2x4 appliance is another staple of this phase. By bonding the four permanent incisors and the two permanent first molars, you gain early control over rotations and spacing. We recommend using a heavy base archwire to maintain arch width while the transitional teeth continue to shift. This setup provides a stable framework that accommodates the natural exfoliation of primary canines and molars without losing the progress you've made. It's a precise way to address aesthetic concerns early while laying the groundwork for Phase II treatment.
Fixed Expander Design Nuances
Deciding between a two-band and a four-band expansion design depends entirely on the available anchorage. If the primary molars are stable, a four-band design distributes the expansion force more evenly across the maxilla. For patients in the inter-transitional phase, we often suggest a slower activation protocol. One turn every other day can minimize the stress on primary roots that are already beginning to resorb, ensuring the process remains comfortable and predictable.
Managing Space with Fixed Maintainers
Nance appliances and Transpalatal Arches (TPA) are essential for maxillary anchorage. A Nance appliance uses the palatal vault for support, preventing the mesial migration of molars. When we fabricate these, we ensure the acrylic button is sized to avoid tissue impingement while providing a broad base for force distribution. For the mandibular arch, the lingual arch remains the gold standard for managing the Leeway Space. We design these with enough clearance to allow the permanent premolars to erupt lingually before they are guided into their final positions by the tongue.
Troubleshooting Eruptive Interference and Exfoliation
Eruptive interference occurs when an appliance inadvertently acts as a physical barrier to the natural path of a permanent tooth. This is the most common complication in appliance design for mixed dentition, often turning a routine treatment into a series of emergency appointments. If the acrylic baseplate or a wire component sits directly over an erupting bicuspid or cuspid, it can deflect the tooth or cause impaction. We approach this by treating the appliance as a living design that must be modified as the patient's anatomy evolves.
The "windows" technique is your primary tool for managing these transitions. By grinding away specific sections of the acrylic before a tooth breaks the surface, you create a clear path for eruption. This is particularly vital during the "Ugly Duckling" stage, where the maxillary incisors often flare and require extra room to settle. We design relief into the appliance from the start, ensuring that as the permanent lateral incisors move, they don't encounter resistance from the baseplate. If a primary anchorage tooth exfoliates mid-treatment, the appliance must remain stable. We achieve this by ensuring the first permanent molars carry the primary load, allowing the appliance to stay functional even when a deciduous tooth is lost.
Acrylic Relief and Eruption Windows
Pre-emptive relief is always better than reactive grinding. In Hawley designs, we can thin the acrylic in the posterior regions where bicuspids are expected to emerge. Visualizing these eruption paths is significantly easier when using 3D printed dental models, as they allow us to see the relationship between the current teeth and the underlying successors. This precision ensures that even after a tooth is lost, the appliance maintains its fit and doesn't become a "loose" nuisance for the patient.
Managing Occlusal Interference
Bite blocks and bite planes are excellent for correcting deep bites, but they can easily become "locked-in" as the arch develops. We recommend regular monitoring to ensure the bite plane isn't preventing the vertical eruption of the posterior teeth. As permanent teeth rotate into position, you may need to adjust the wire components to avoid soft tissue impingement or unwanted pressure. Our laboratory team focuses on meticulousness during fabrication so that your chairside adjustments are minimal and effective. If you're struggling with a case where teeth are erupting in unexpected directions, consult with our expert technicians today to refine your appliance design.
Optimizing Lab Communication for Mixed Dentition Cases
Successful appliance design for mixed dentition isn't a solo effort. It requires a tight collaborative loop between your chairside observations and our laboratory's technical execution. Because the pediatric arch is in constant flux, a generic prescription often falls short of the precision required for a stable fit. You need a partner who understands that a partially erupted molar or a missing primary canine isn't a hurdle, but a critical factor in the appliance's overall architecture.
Switching to a digital workflow significantly simplifies the capture of complex transitional anatomy. While physical impressions can sometimes distort or fail to record the shallow undercuts of short primary crowns, intraoral scans provide a high-fidelity 3D record. These digital STL files allow our technicians to visualize the eruption paths of permanent successors with meticulousness. When you share digital records, you eliminate the margin of error associated with stone model expansion or shipping damage, ensuring the appliance arrives with a "snap-in" fit. Choosing a high quality orthodontic lab means you have an ally who can spot potential eruptive interferences before the hardware is even built.
Accurate 3D records also serve as a baseline for tracking tooth movement over time. If a patient returns for a follow-up and the appliance no longer fits, we can compare the current state to the original scan to determine if the dental shifts were expected or if the design needs a strategic modification. This data-driven approach reduces guesswork and helps you maintain control over the transitional phase.
Writing the Perfect Prescription
A great prescription acts as a roadmap for the technician. Instead of a general request, provide specific instructions for "future-proofing" the design. You might specify wire gauges for different segments, such as using a lighter .026" wire for primary incisors while maintaining a standard .028" for permanent molars. Clearly indicate which teeth require acrylic relief or where you anticipate the next permanent tooth to emerge. Sharing these details ensures we build an appliance that accommodates growth rather than fighting against it.
The Brightline Advantage
At Brightline, we bring 18 years of technical expertise to every case we handle. We don't just follow a form; we partner with you to solve the logistical stresses of pediatric orthodontics through precision engineering. Our team specializes in custom mixed dentition appliances that prioritize both stability and patient comfort. We encourage direct collaboration, allowing you to talk to the technician about your specific case goals. This open dialogue ensures that every appliance we deliver supports your clinical intent and helps you achieve proper arch development with minimal chairside adjustments.
Mastering the Transitional Arch
Navigating the "moving target" of a child's mouth requires a shift from static planning to dynamic design. You've seen how strategic clasping and proactive acrylic relief can prevent eruptive interference, ensuring that your treatment progress isn't stalled by natural exfoliation. By prioritizing the first permanent molars as stable anchorage points and utilizing digital workflows, you can manage these complex cases with far greater predictability. Effective appliance design for mixed dentition is about more than just a snapshot in time; it's about anticipating the arch's evolution with every turn of the screw.
We're here to simplify that process for you. With over 18 years of specialized orthodontic lab experience, we understand the technical nuances of these cases. Our US-based precision manufacturing ensures every appliance meets your exact standards, while our expert support for digital STL workflows simplifies the transition from scan to delivery. Partner with Brightline for Precision Mixed Dentition Appliances to ensure your patients experience a stable, comfortable transition to their permanent smile. We're ready to act as an extension of your team, providing the reliability you need for every young patient in your chair.
Frequently Asked Questions
What is the best appliance for posterior crossbite in mixed dentition?
A Rapid Palatal Expander (RPE) is generally the most effective choice for correcting a posterior crossbite in the mixed arch. It provides the necessary orthopedic force to widen the maxilla before the midpalatal suture fuses. Depending on the patient's specific dental age, you might choose a bonded RPE to utilize primary tooth anchorage or a banded RPE if the first permanent molars are fully erupted and stable.
Can I use a Hawley retainer if the patient is still losing teeth?
You can certainly use a Hawley retainer during this phase, provided the appliance design for mixed dentition includes strategic relief for erupting successors. We recommend using the "windows" technique, where acrylic is ground away in areas where teeth are expected to exfoliate soon. This allows the permanent teeth to emerge without the appliance becoming a physical barrier to natural growth.
How do I maintain anchorage if the primary second molars are loose?
Shift your primary anchorage to the first permanent molars to ensure stability when primary teeth become mobile. Relying on loose deciduous teeth can lead to appliance displacement or discomfort for the child. If the permanent molars aren't fully erupted, consider adding palatal coverage to the baseplate to distribute forces across the hard palate, which reduces the load on individual mobile teeth.
Is a banded or bonded RPE better for a 7-year-old patient?
A bonded RPE is often the superior choice for a 7-year-old patient because it provides excellent anchorage on primary molars with short clinical crowns. The acrylic occlusal coverage also acts as a temporary bite block, which is helpful if a functional shift is present. If the first permanent molars are fully erupted and have sufficient undercuts, a banded RPE remains a reliable alternative for transverse correction.
How much acrylic relief is needed for an erupting premolar?
Provide approximately 1 to 2 millimeters of clearance between the acrylic baseplate and the expected eruption path of the premolar. This space ensures the tooth can break through the gingiva without hitting the appliance. Regular monitoring is essential; if the tooth begins to rotate or deviate, you may need to increase the relief area chairside to guide it into the correct position.
What wire gauge is recommended for Adams clasps on primary teeth?
We recommend using .028" (0.7mm) stainless steel wire for Adams clasps on primary second molars. This specific gauge offers the right balance of rigidity for retention and flexibility to navigate the bulbous anatomy of deciduous teeth. Using a thinner wire might lead to frequent distortions, while a thicker wire can be too difficult to adjust for the short clinical crowns found in the mixed arch.
Can 3D printed models be used for mixed dentition appliances?
Yes, 3D printed models are highly effective for fabricating mixed dentition appliances because they capture transitional anatomy with extreme precision. Digital scans eliminate the risk of model breakage or distortion common with stone casts. These models allow us to visualize the relationship between primary and permanent teeth more clearly, resulting in a more accurate fit and reduced chair time for delivery.
How do I adjust a lingual arch as permanent teeth erupt?
Adjust the lingual arch by ensuring the wire remains 1 to 2 millimeters away from the lingual surfaces of erupting permanent incisors and premolars. This clearance prevents the wire from interfering with the natural lingual-to-labial eruption path. If the permanent molars shift, you can carefully activate the adjustment loops to maintain the proper arch length and keep the Leeway Space preserved for the erupting bicuspids.