
The difference between a perfect fit and a frustrated patient often comes down to a few millimeters of stainless steel. While the Hawley is a staple of orthodontic retention, mastering its nuances is a clinical art form that requires both patience and precision. If you've ever felt the stress of an appliance "rocking" during delivery or worried about snapping a solder joint while tightening a labial bow, you're certainly not alone. This hawley retainer adjustment guide for clinicians provides the reliable framework you need to navigate these chairside challenges with quiet confidence.
We understand that your priority is ensuring long-term stability while maintaining patient comfort, and we're here to support that mission. You'll learn exactly which pliers to reach for to achieve specific bends, how to quickly resolve soft tissue impingement, and the clear criteria for determining when a lab remake is the most efficient path forward. By the end of this guide, you'll have a refined protocol to ensure every appliance delivers the meticulous quality your patients expect. Let's dive into the technical details of wire manipulation and troubleshooting to keep your practice running smoothly.
Key Takeaways
- Understand the dynamic relationship between the acrylic base and the labial bow to ensure the appliance provides stable, balanced counter-forces.
- Utilize this hawley retainer adjustment guide for clinicians to select the proper pliers for every bend, preventing wire "notching" or structural fatigue.
- Learn to quickly diagnose the root causes of a "rocking" appliance, distinguishing between simple wire tension issues and impression inaccuracies.
- Master a step-by-step protocol for adjusting Adam’s clasps and gingival loops to achieve a precise, reliable snap-fit during delivery.
- Establish clear clinical criteria to determine when a chairside adjustment is sufficient and when a professional lab remake is necessary for patient comfort.
Understanding Hawley Retainer Mechanics: Labial Bow and Acrylic Base Dynamics
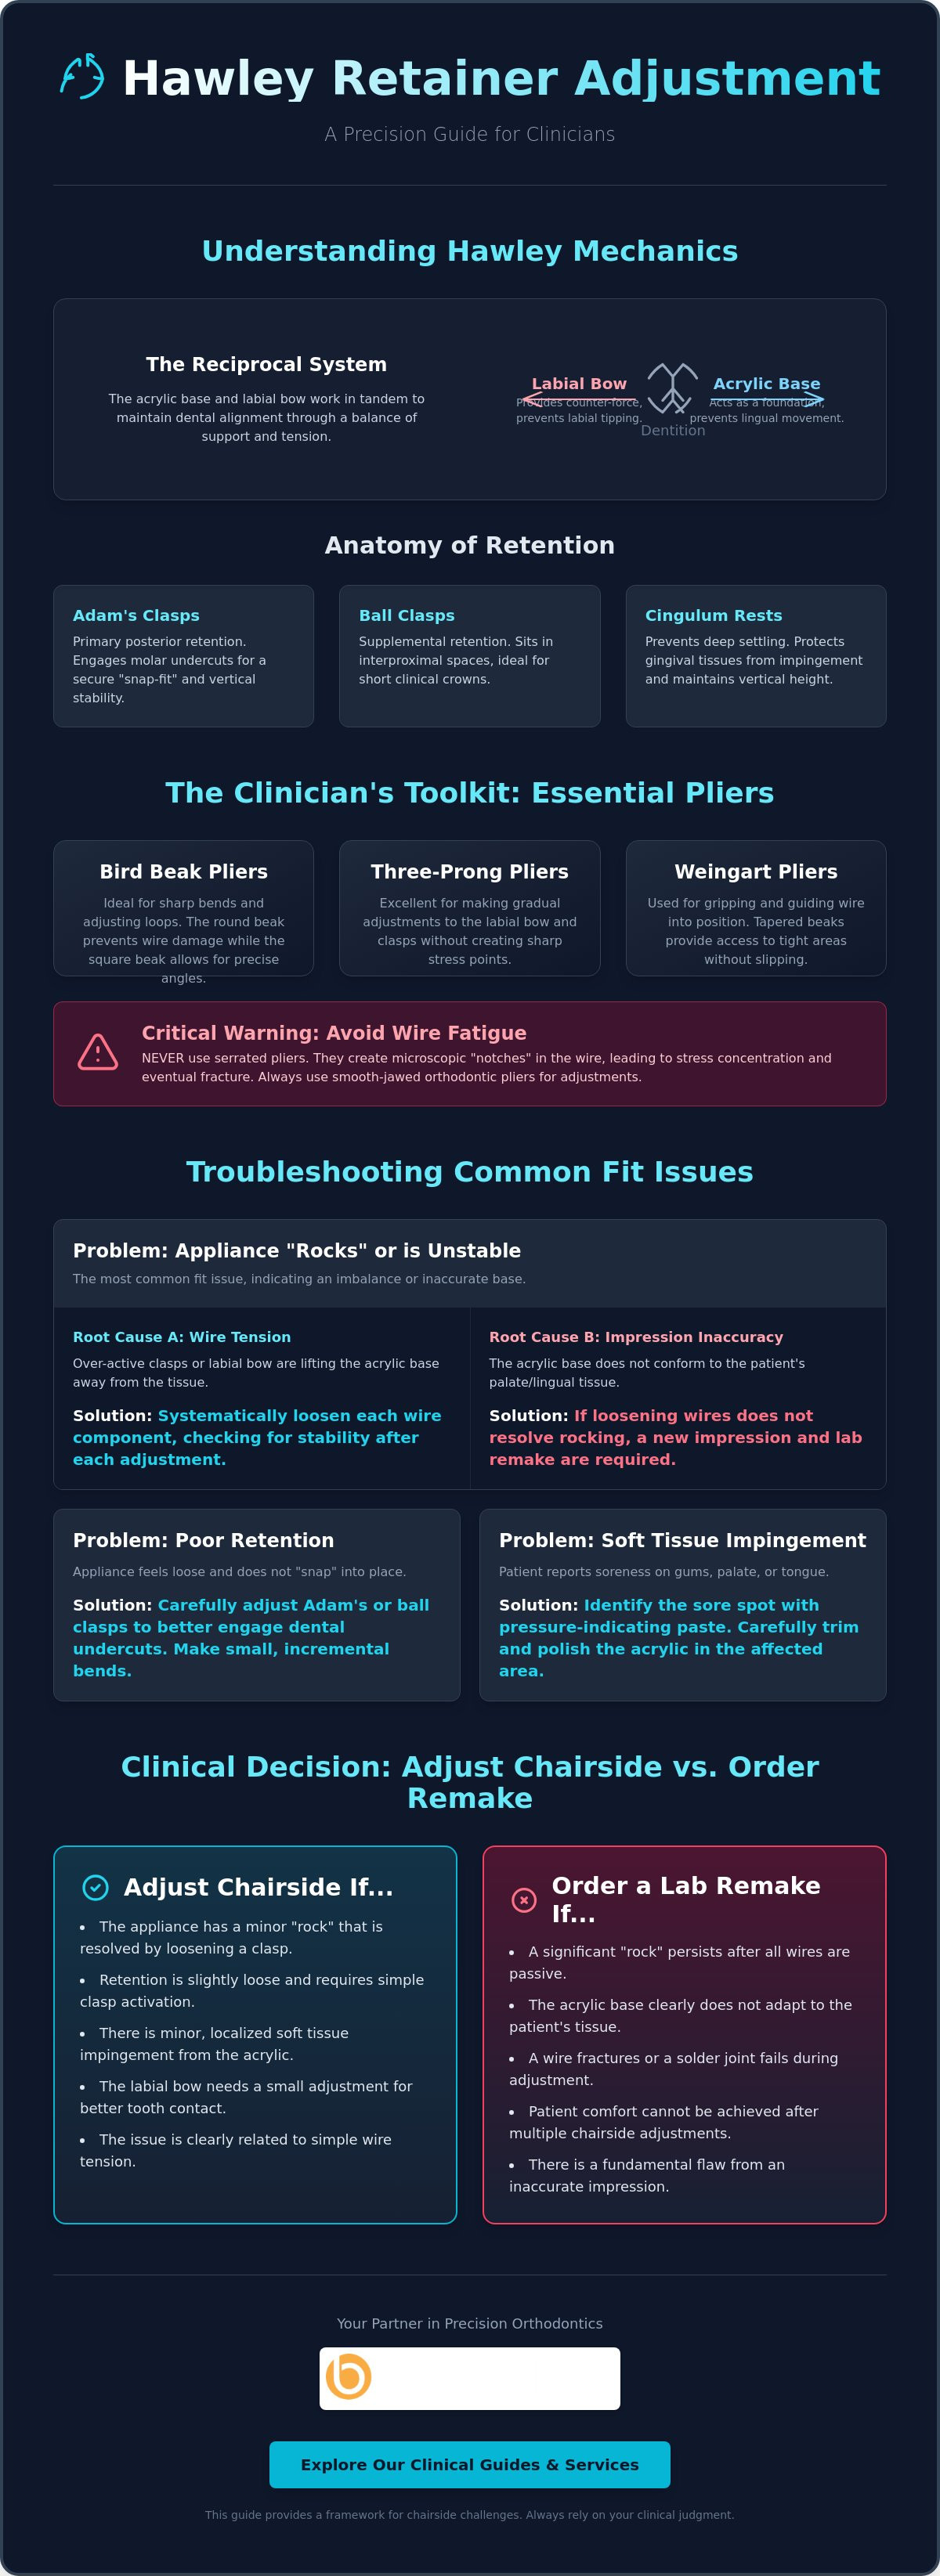
The success of post-orthodontic stability relies on a delicate balance between rigid support and flexible tension. While some clinicians view the appliance as a single unit, it's more accurate to think of it as a reciprocal system where the acrylic base and the stainless steel wire work in tandem. The acrylic base acts as the foundation, providing the primary seat and essential palatal or lingual stability. If this base doesn't adapt perfectly to the soft tissue, the entire appliance loses its reference point, making wire adjustments unpredictable. This hawley retainer adjustment guide for clinicians emphasizes that a secure seat is the prerequisite for any chairside modification.
The labial bow serves as the critical counter-force to the acrylic base. While the acrylic prevents lingual movement, the wire bow prevents labial tipping, effectively "sandwiching" the dentition in its corrected position. In a passive state, the wire should lightly touch the most prominent labial surfaces without exerting pressure. When you transition the appliance to an active state to correct minor rotational relapse, you're essentially increasing the tension at the U-loops. This meticulous balance ensures the Orthodontic Retainer maintains arch integrity over years of use rather than just months.
The Anatomy of Retention: Clasps and Rests
- Adam’s clasps: These are your primary source of posterior retention. They utilize the mesio-buccal and disto-buccal undercuts of the molars to provide vertical stability and a satisfying "snap" upon insertion.
- Ball clasps: We often use these for supplemental retention. They sit in the interproximal spaces, providing extra grip when the patient has short clinical crowns or limited molar undercuts.
- Cingulum rests: These small wire extensions prevent the appliance from settling too deeply. They protect the gingival tissues from impingement and ensure the vertical height of the retainer remains constant during mastication or nocturnal wear.
Material Considerations for Clinicians
Precision starts with understanding your materials. Most Hawley appliances use stainless steel wire in .028 or .032 gauges. The .032 wire offers significant resistance to deformation, which is ideal for the labial bow, while .028 is frequently used for clasps that require more frequent manual manipulation. It's also vital to distinguish between cold-cure and heat-cure acrylic bases. Heat-cure acrylic is generally more durable but can be more brittle during aggressive trimming. If you're interested in how these materials are integrated during the build process, you can refer to our Clinical Guide to Hawley Retainers for deeper fabrication insights. Understanding these material limits helps you avoid cracking the base or over-stressing the wire during chairside sessions.
Essential Orthodontic Plier Selection for Precise Wire Manipulation
Using the wrong tool for wire manipulation isn't just a matter of convenience; it's a matter of appliance longevity. When you use serrated pliers on orthodontic wire, you risk "notching" the surface. These microscopic nicks create stress concentrations that eventually lead to wire fatigue or sudden fracture. A professional Retainer Adjustment Protocol requires smooth-jawed pliers designed specifically for the gauge of wire used in Hawley appliances. This hawley retainer adjustment guide for clinicians highlights that precision is as much about the tools you choose as the technique you apply.
Understanding the difference between active bending and simple repositioning is equally vital. Active bending involves changing the wire's memory to increase tension, whereas repositioning simply moves the wire to a more comfortable location for the patient. If you're working near auxiliary wires, you must exercise extreme caution. Solder joints are the most vulnerable points on the appliance. Applying torque directly to a joint can cause it to fail, often necessitating a lab repair. We recommend holding the wire with one pair of pliers to stabilize the joint while using a second pair to make the necessary adjustment.
The Clinician’s Essential Trio
- Three-Prong Pliers: These are your go-to for adjusting the "U-loops." By placing the single prong on the inside of the loop and closing the handles, you can increase the labial bow's tension with incredible control.
- Bird-Beak Pliers: This is arguably the most versatile tool in your kit. Use the round beak for creating smooth loops and the flat beak for adjusting the bridge heights of Adam’s clasps.
- Hollow-Chop Pliers: If the labial bow has lost its arch form, these pliers allow you to re-contour the wire without introducing sharp kinks or unappealing angles.
Auxiliary Tools for Acrylic Modification
While wire adjustments provide retention, acrylic modifications ensure comfort. Use acrylic burs in a slow-speed handpiece to relieve pressure points identified during the seating process. If a patient reports a "sore spot" on the palate, articulating paper can help you identify exactly where the acrylic is impinging on the tissue. Once you've ground down the high spots, always use polishing wheels to restore a high-luster finish. A rough surface doesn't just feel uncomfortable; it also harbors plaque and bacteria. For practices that prioritize this level of technical detail, partnering with a high-quality lab can simplify your chairside workflow significantly.
Treat your pliers with the same care as your handpieces. Regular sterilization and lubrication of the joints will prevent corrosion and ensure the smooth action required for delicate bends. If a plier becomes stiff or the tips become misaligned, it's time for a professional refurbishment or replacement. Maintaining your tools is the first step in maintaining your clinical standards.
Troubleshooting Common Fit Issues: Retention, Comfort, and Arch Integrity
When a patient sits in your chair and the retainer doesn't seat with that satisfying "snap," the troubleshooting process begins. A rocking appliance is often the first hurdle you'll encounter. Is it a simple wire tension issue, or was the initial impression slightly distorted? This hawley retainer adjustment guide for clinicians helps you differentiate between these scenarios quickly. If the appliance fits perfectly on your 3D printed dental models but rocks in the mouth, the issue likely lies with clinical tooth movement or a soft tissue discrepancy. We find that verifying the fit on the model first saves significant chairside time.
Distinguishing between a poor fit and minor relapse is a critical skill. If the acrylic base seats fully but the labial bow stands off the teeth, you're likely looking at minor labial tipping. This often occurs in the window between the impression date and the delivery appointment. If the appliance won't seat at all, check for new restorative work. A fresh composite filling or a crown can easily compromise the path of insertion. Managing patient complaints about "tightness" during the first week is usually a matter of reassurance. However, "looseness" almost always requires an active adjustment to the retention components to ensure the appliance remains effective.
Identifying Pressure Points
Start with a visual inspection of the gingiva. Look for areas of blanching or localized inflammation, which indicate the acrylic is pressing too hard against the tissue. If the source of discomfort isn't immediately obvious, use disclosing wax to identify specific high spots on the acrylic base. This allows for meticulous relief of the appliance without over-grinding. For patients struggling with speech interference, you can often thin the anterior palatal area. Just be careful not to compromise the structural strength of the base. It's a delicate balance between patient comfort and long-term durability.
Retention Failure: Clasp vs. Bow
- Adam’s clasps: Verify that the arrowheads are engaging the mesio-buccal and disto-buccal undercuts of the first molars. If they're sitting too high on the clinical crown, the retainer will feel loose and unstable.
- Labial bow: Ensure the wire makes contact with the middle third of the clinical crowns. If the bow has migrated toward the incisal edge, it won't provide the necessary counter-force to prevent labial tipping.
- Wire fatigue: In older appliances, the stainless steel can lose its "spring." If the wire feels soft or easily deformed during your adjustment, it's likely reached the end of its functional lifespan and needs replacement.
By systematically ruling out these common issues, you can resolve most fit complaints in a single appointment. This methodical approach not only improves the patient experience but also reinforces your position as a reliable ally in their orthodontic journey. If the appliance still fails to seat after these checks, it's time to evaluate if a lab remake is the more efficient solution.
Step-by-Step Adjustment Protocol for Labial Bows and Adam’s Clasps
Precision requires a sequence. Following a structured hawley retainer adjustment guide for clinicians ensures that each modification is deliberate and effective, reducing the risk of over-correction. Before you reach for your pliers, observe the appliance in the mouth. This five-step protocol will help you achieve a reliable fit every time.
- Step 1: Verify the appliance seat. Check the acrylic-to-tissue adaptation first. While it's tempting to address the labial bow immediately, the acrylic base must be fully seated to serve as a stable anchor for subsequent wire bends.
- Step 2: Adjust posterior retention. Tighten the Adam’s clasp gingival loops using bird-beak pliers. This establishes the "snap" that keeps the appliance in place during speech and function.
- Step 3: Activate the labial bow. Slightly close the U-loops with three-prong pliers to increase the counter-force against the anterior teeth.
- Step 4: Check for arch-form symmetry. Look from an occlusal perspective to ensure the bow isn't skewed to one side. A lopsided bow can cause unwanted tooth movement over time.
- Step 5: Perform a final occlusal check. Verify the patient can remove and insert the appliance easily. Ensure no wire components interfere with the patient’s natural bite.
If you find that an appliance consistently requires aggressive modification to seat, it may indicate a deeper issue with the initial impression or model. To ensure your practice receives appliances that require minimal chairside time, partner with our expert laboratory team for precision-crafted Hawley retainers.
Adjusting the U-Loop for Labial Tension
Positioning your pliers correctly is half the battle. Place the single prong of your three-prong pliers on the inside of the U-loop for activation. We follow a strict "less is more" rule; making small, incremental 0.5mm adjustments prevents the wire from becoming too tight or uncomfortable. Always maintain the horizontal plane during this process. If the bow moves incisally or gingivally during activation, it won't provide the proper force and may even cause the appliance to unseat. This hawley retainer adjustment guide for clinicians prioritizes these minor, meticulous movements to protect the wire's structural integrity.
Refining Adam’s Clasp Retention
Focus on the "bridge" of the clasp to improve molar adaptation. You can bend the arrowheads deeper into the mesial and distal undercuts to increase the grip. However, you must be cautious with solder joints. Aggressive bending near these points is the leading cause of clasp breakage. If you need to make a significant change to the arrowhead position, stabilize the wire near the joint with one pair of pliers while making the bend with another. This supportive technique prevents the torque from transferring to the vulnerable solder, ensuring the appliance remains durable for years of wear.
Clinical Decision Making: When to Adjust Chairside vs. Ordering a Lab Remake
Every clinician eventually faces a "point of no return" during a chairside adjustment. While this hawley retainer adjustment guide for clinicians provides the framework to resolve most fit issues, some discrepancies are beyond the reach of bird-beak pliers. If you encounter significant rocking that doesn't resolve after tightening the Adam’s clasps, or if there's a major arch-width discrepancy, a lab remake is usually the most efficient path. Attempting to force a fit in these scenarios often leads to patient discomfort and poor compliance.
Restorative work is another common catalyst for a remake. If a patient receives a new crown or a large multi-surface composite filling, the original appliance may no longer seat correctly. While you can sometimes relieve the acrylic to accommodate minor changes, significant alterations to the tooth's undercut will render the original retainer obsolete. You must weigh the cost of your chair time against the lab fabrication fee. Spending 45 minutes struggling with a stubborn wire often costs the practice more than simply starting fresh with a new impression. Choosing the right partner helps minimize these instances; our guide on what to look for in an ortho lab explains how a meticulous manufacturing process reduces the frequency of remakes from the very first delivery.
Signs a Hawley Needs Replacement
- Fractured acrylic bases: If the acrylic has cracked through the palate or lingual flange, the structural integrity is lost. Surface repairs are often temporary and can harbor bacteria.
- Work-hardened wires: Stainless steel has a limit. If a wire has been bent back and forth multiple times, it becomes brittle. If you see signs of stress or if the wire snaps during a routine adjustment, the appliance is finished.
- Significant relapse: If the patient has experienced more than 1 or 2mm of movement, the retainer may no longer seat fully. Forcing a fit in this state can cause pain and won't effectively move the teeth back to their original positions.
Partnering with Brightline for Precision Remakes
When a remake is necessary, we make the process as seamless as possible. By utilizing digital workflows and sending STL files, you ensure that the new appliance is built on an incredibly accurate foundation. This modern adaptability eliminates the distortion risks associated with traditional stone models. Clear communication is also vital; if a specific adjustment failed chairside, let us know so we can refine the design of the replacement. We're here to act as an extension of your team, ensuring that your retention strategy is as dependable as your clinical skill. Ready to upgrade your practice’s retention strategy? Contact Brightline Orthodontic Lab for precision-engineered Hawley retainers and experience the difference that meticulous craftsmanship makes.
Mastering the Art of Clinical Retention
Mastering the nuances of wire manipulation transforms delivery appointments from a source of stress into a demonstration of expertise. This hawley retainer adjustment guide for clinicians emphasizes the importance of a systematic approach, from verifying the acrylic seat to making incremental 0.5mm adjustments at the U-loops. When you balance technical precision with clear clinical decision making, you ensure that every patient leaves your chair with a comfortable, effective appliance that stands the test of time.
While chairside skills are essential, the foundation of success is always a high-quality appliance. We support your practice with over 18 years of industry experience, providing precision-engineered retainers that minimize the need for aggressive modifications. Our US-based lab is fully digital-ready, accepting STL files to ensure 3D printed accuracy for every case we handle. Partner with Brightline for precision-engineered Hawley retainers and experience a smoother workflow designed around your specific needs. We're here to help you achieve lasting results and maintain beautiful smiles with confidence.
Frequently Asked Questions
How much can I safely adjust a Hawley labial bow before the wire weakens?
Safe adjustments are typically limited to incremental changes of 0.5mm to 1mm at a time. If you find yourself bending the wire back and forth repeatedly, you risk work-hardening the stainless steel, which leads to microscopic fractures. Once the wire loses its "spring" or feels soft, it has likely reached its structural limit and may snap under further tension.
Can I use heat to make the acrylic base more flexible for adjustments?
You should avoid using high heat on the acrylic base because it can cause permanent distortion or discoloration. While some clinicians use warm water to slightly soften the material for very minor seating issues, a torch or direct flame will damage the polymer chains. If the base doesn't fit, it's better to use an acrylic bur for relief rather than risking the integrity of the entire appliance with heat.
What is the best way to tighten a loose Adam’s clasp chairside?
The most effective method is using bird-beak pliers to slightly bend the arrowheads deeper into the mesial and distal undercuts of the molar. You can also adjust the bridge of the clasp to bring the wire closer to the buccal surface. Always stabilize the wire near the solder joint with your fingers or another pair of pliers to prevent the torque from snapping the connection.
How do I identify if a fit issue is due to a lab error or a poor impression?
Compare the appliance fit to the original master model or the 3D printed model used for fabrication. If the retainer fits the model perfectly but rocks in the patient's mouth, the issue is almost certainly a distorted impression or subsequent tooth movement. If the appliance doesn't even fit the model, it indicates a lab error in the bending or curing process.
Is it possible to adjust a Hawley retainer for a patient who just received a new crown?
You can make minor adjustments if the new crown closely mimics the original tooth's anatomy. Use this hawley retainer adjustment guide for clinicians to identify where the acrylic or wire is impinging on the new restoration. However, if the crown significantly alters the buccal undercut or the occlusal height, the retainer will likely require a professional lab remake to ensure proper retention.
What are the most common mistakes clinicians make when adjusting Hawley wires?
One of the most frequent errors is using serrated pliers, which create nicks that lead to wire failure. Clinicians also often attempt to adjust the labial bow before ensuring the acrylic base is fully seated. This sequence is critical; if the foundation isn't stable, your wire adjustments will never be accurate. Always make small, incremental changes rather than one large, aggressive bend.
How often should a clinician check the fit of a Hawley retainer during follow-up visits?
Schedule a fit check every 3 to 6 months during the first year of retention to monitor for minor relapse or wire fatigue. After the first year, an annual check is usually sufficient. Regular evaluations allow you to catch "loose" clasps early, which prevents the patient from discontinuing wear due to a poor fit. This proactive approach supports long-term stability and patient satisfaction.