
You've just seated a custom appliance, but the patient immediately mentions a slight "rock" or a feeling of excessive tightness. We know that these small discrepancies can quickly turn a routine delivery into an unexpected drain on your chair time. It's frustrating when a procedure that should be simple leads to multiple follow-up visits or, worse, an appliance that breaks because it was thinned too much during troubleshooting. This acrylic night guard adjustment guide is here to help you refine your chairside process, ensuring every patient leaves with a perfectly balanced occlusal splint in under 15 minutes.
We see ourselves as a supportive extension of your team, and we want to help you bridge the gap between laboratory precision and clinical comfort. By mastering these methodical equilibration and finishing techniques, you'll provide a high-gloss surface that resists biofilm while significantly reducing patient discomfort. We'll cover the essential steps for identifying heavy contacts, managing fit issues, and achieving a professional polish that lasts. Let's dive into the techniques that will simplify your workflow and enhance the longevity of every appliance you deliver.
Key Takeaways
- Learn to select the ideal acrylic-specific carbide burs and handpiece settings to ensure efficient bulk reduction without compromising the appliance's integrity.
- Follow this acrylic night guard adjustment guide to master centric relation markings and achieve a perfectly balanced occlusion in under 15 minutes.
- Discover how to quickly diagnose and resolve common fit issues like rocking or excessive tightness using pressure-indicating paste and systematic diagnostic pressure.
- Implement a professional polishing protocol to create a high-gloss finish that maximizes patient comfort and prevents the accumulation of plaque and bacteria.
- Explore how leveraging digital workflows and 3D printed models can significantly reduce the need for extensive chairside adjustments during the delivery appointment.
Essential Armamentarium and Preparation for Acrylic Adjustments
Setting the stage for a seamless delivery starts long before you pick up a handpiece. Efficiency isn't just about speed; it's about having a methodical system that minimizes stress for both you and your patient. This acrylic night guard adjustment guide begins with the basics of preparation, ensuring you have every tool ready to create a precise fit. Start by verifying that the appliance is pristine. Any residual lab debris or polishing compound left in the intaglio surface can interfere with the initial seating and lead to false readings during equilibration. We recommend a supportive, collaborative approach from the moment the patient sits down. Clear communication about what they'll feel during the fitting helps reduce anxiety and fosters a more relaxed occlusal response.
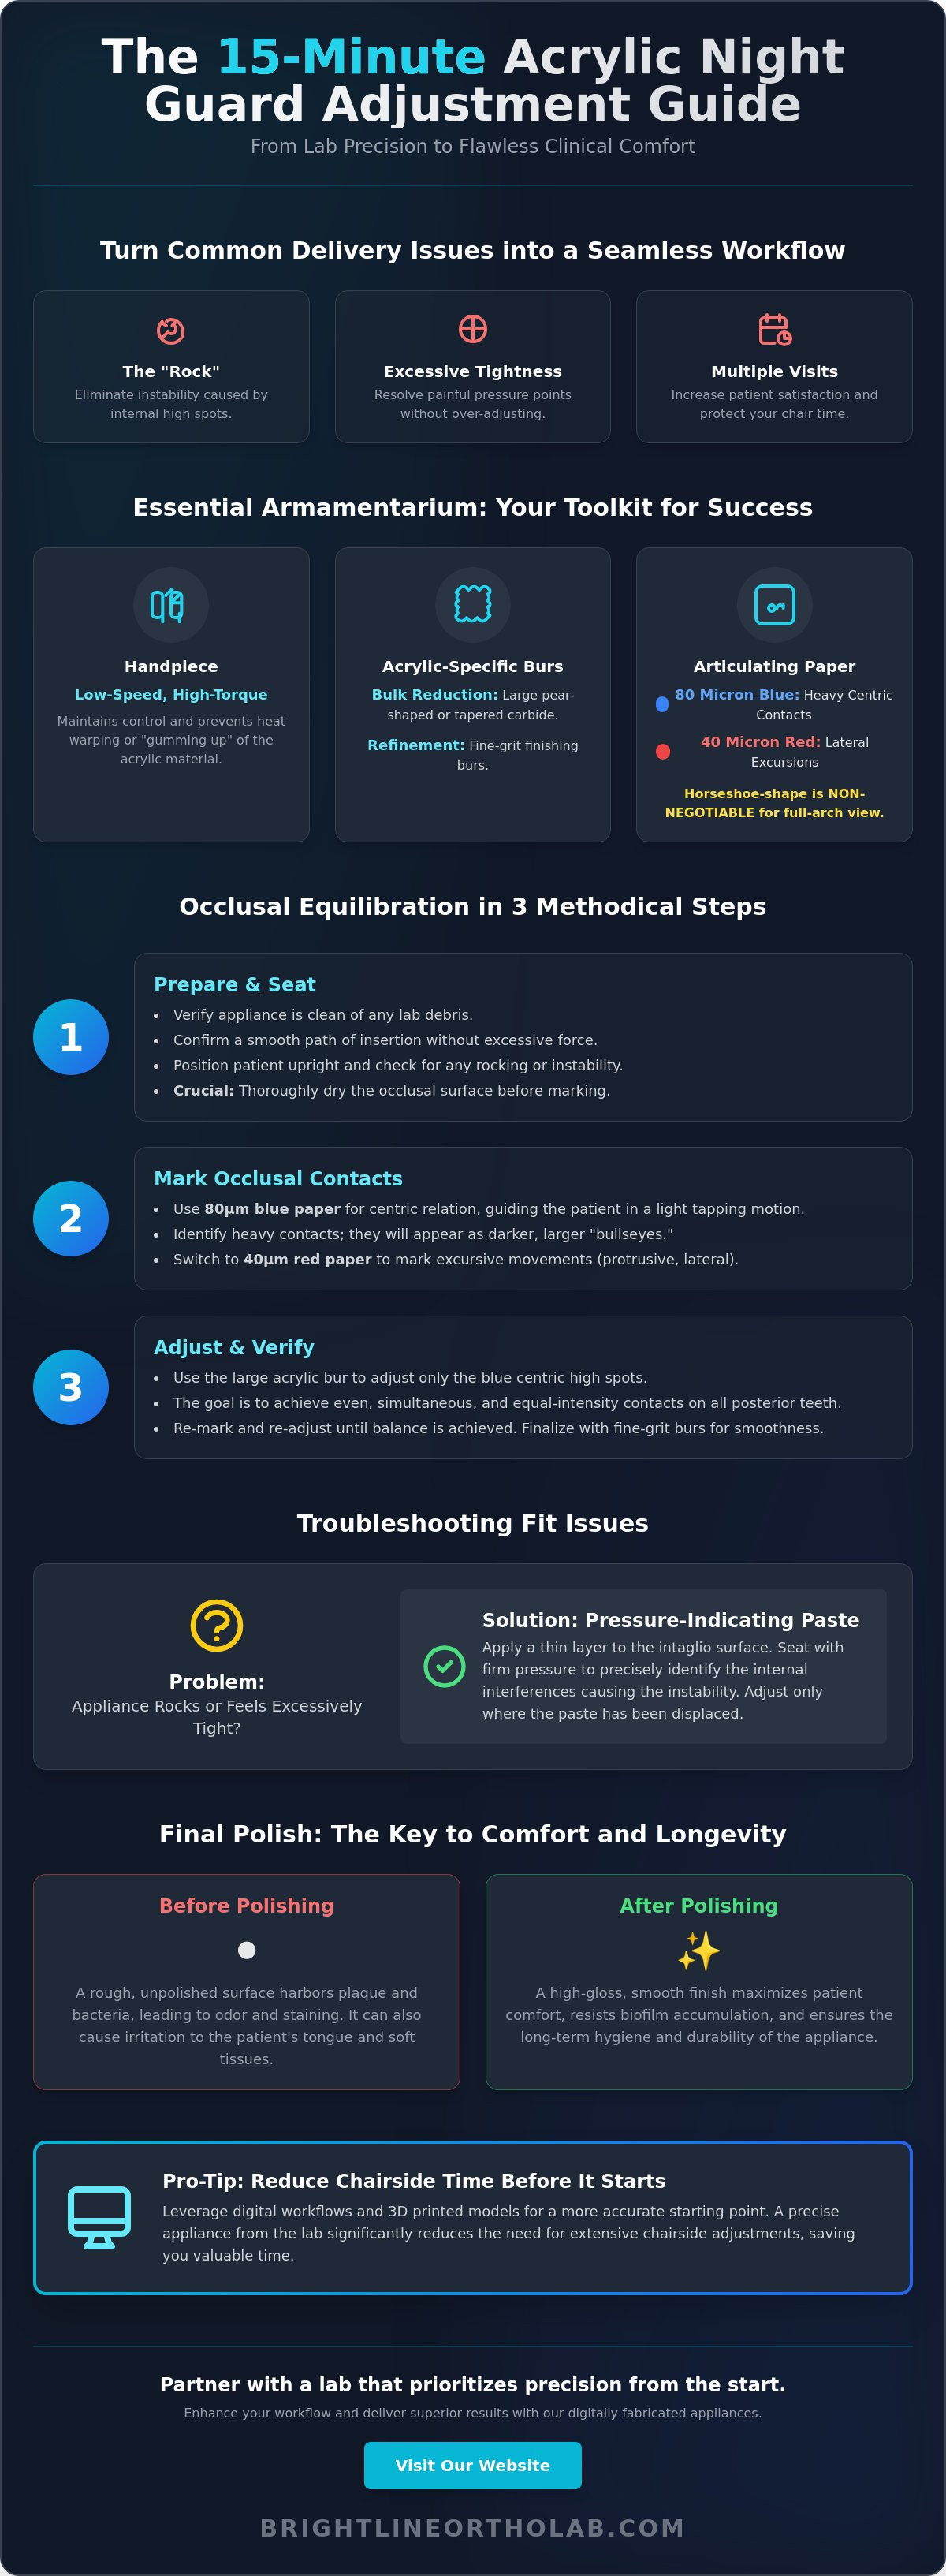
Your choice of handpiece is critical. Use a low-speed handpiece with high torque settings to maintain control during bulk reduction. High speeds can generate excessive heat, which may warp the material or cause it to "gum up" the flutes of your burs. By keeping your equipment calibrated, you ensure a smoother finish and a more predictable adjustment process. Clinicians often rely on occlusal splints to manage bruxism, but the clinical success of these devices depends entirely on the meticulousness of your chairside preparation.
Tools of the Trade: Bur and Paper Selection
Selecting the right burs saves time and prevents material failure. We suggest using large pear-shaped or tapered acrylic-specific carbide burs for initial bulk reduction. These shapes allow you to remove high spots quickly without creating sharp gouges in the material. Once you've achieved a basic balance, switch to fine-grit burs for refinement. For marking, use a dual-color system. We find that 80-micron blue paper works well for identifying heavy centric contacts, while 40-micron red paper is ideal for capturing lateral excursions. Using horseshoe-shaped paper is non-negotiable; it ensures you're seeing the full-arch occlusal relationship rather than isolated segments. Keeping a dedicated "acrylic kit" in your operatory will streamline this workflow and keep your focus on the patient.
Patient Positioning and Initial Seating
Before you ask the patient to bite down, verify the path of insertion. The guard should seat firmly without requiring excessive force. If you feel resistance, check for internal interferences or tight interproximal contacts first. Position the patient in an upright, neutral posture during the final checks. This simulates the natural forces they'll apply to the guard while they're in a functional position. Assess the initial retention carefully; the appliance should stay in place during speech and jaw movement without rocking. This acrylic night guard adjustment guide emphasizes that a stable foundation is the only way to achieve accurate occlusal markings. If the guard isn't seated properly, your markings will be misleading and lead to over-adjustment.
A Step-by-Step Guide to Occlusal Equilibration and Balancing
Once the appliance is seated and stable, the focus shifts to the fine art of equilibration. Achieving a balanced bite is the most critical factor in patient compliance; even a microscopic discrepancy can lead to discomfort or a refusal to wear the guard. Before you begin marking, dry the occlusal surface of the night guard thoroughly with an air syringe. Moisture from saliva prevents articulating paper from leaving crisp, legible marks, often leading to "false negatives" where high spots exist but don't show up on the material. This acrylic night guard adjustment guide emphasizes that clear data is the only way to make precise corrections.
Guide your patient gently into centric relation to capture the initial contact points. We recommend a light, tapping motion rather than a heavy grind at this stage. Evidence-based research on the types and effectiveness of occlusal splints suggests that improper balancing can actually increase muscular tension. By ensuring the forces are distributed evenly, you're not just protecting the teeth; you're supporting the entire stomatognathic system. If you're looking to start with a more accurate foundation, consider how our precision-crafted appliances can streamline your delivery appointments.
Centric Relation and Initial Contacts
Start by marking centric contacts with blue articulating paper. Look for "donuts"—marks with a clear center and a dark outer ring—which indicate a heavy, premature contact point that needs flattening. Your goal is to achieve bilateral, simultaneous contacts across the arch. Ideally, you want at least one stable contact point per tooth to ensure force distribution is uniform. Use your pear-shaped carbide bur to reduce these high areas until the blue marks appear as small, consistent dots rather than large, smeared patches. This methodical reduction prevents over-thinning the acrylic while establishing a reliable baseline bite.
Managing Excursive and Protrusive Interferences
After stabilizing the centric bite, switch to red articulating paper to evaluate functional movements. Ask the patient to slide their jaw left, right, and forward. These red lines will show you the "pathway" of the teeth across the guard. You must eliminate any posterior interferences that "trip" the jaw or cause the appliance to dislodge during movement. Aim for smooth canine or anterior guidance that allows the posterior teeth to disocclude immediately. If the patient feels a "snag" or a "bump" during these movements, refine the red paths until the glide is effortless. A truly balanced guard feels invisible to the patient during both rest and function.
Troubleshooting Clinical Fit Issues: Rocking, Retention, and Speech
Even when the occlusion looks perfect on paper, the internal fit of the appliance can determine whether a patient actually wears it. Start your troubleshooting by placing the guard in the mouth and applying alternating pressure on the molar regions. If you notice any pivoting or instability, you're likely dealing with an internal interference or a slight distortion in the initial impression. This acrylic night guard adjustment guide recommends a systematic diagnostic path rather than trial-and-error grinding. Use Pressure Indicating Paste (PIP) or a fit checker to visualize the internal contact points. Paint a thin, even layer inside the guard, seat it firmly, and look for "show-through" areas where the paste has been displaced. These spots indicate exactly where the acrylic is binding against the dentition.
Adjusting the internal surface requires a delicate touch. You want to relieve the pressure points without compromising the retentive "snap" fit that keeps the guard secure overnight. If you're working with dual-laminate materials, you'll encounter different challenges than with traditional hard acrylic. For more specific details on these materials, you can reference our guide on fabricating a hard soft night guard. We've found that understanding the layering process helps clinicians make more informed decisions when thinning material for fit or speech.
Solving the Rocking Splint
A rocking splint is often caused by a "high spot" on the internal surface near the terminal molars. Check the distal-most anatomy on your 3D model or impression to ensure the lab had an accurate representation of the arch. If the guard seats but pivots when the patient bites, the interference is usually on the occlusal surface. However, if it rocks before it's fully seated, the problem is internal. Relieve the internal undercut areas slightly if the guard feels like it's binding. Meticulousness here prevents the frustration of a "bouncy" appliance that never feels quite right to the patient.
Adjusting for Tightness or Inadequate Retention
If a patient complains that the guard is too tight, don't immediately reach for the handpiece. For dual-laminate guards, try soaking the appliance in warm water for about 30 seconds before seating it. This softens the internal layer just enough to allow for better adaptation. If the tightness persists, check the height of the buccal and lingual flanges. Reducing these flanges slightly can alleviate soft tissue pressure and make the appliance feel less intrusive. You've achieved the right balance when the patient can remove the guard easily with their fingers, but it remains fully seated during speech and functional jaw movements.
Refining the Surface: Polishing Protocols for Patient Comfort
Polishing is the final bridge between a functional appliance and a comfortable one. After following the acrylic night guard adjustment guide for equilibration, you're often left with a surface that feels "gritty" or "rough" to the patient's tongue. This isn't just a comfort issue; microscopic scratches are breeding grounds for plaque and bacteria. We recommend a systematic approach to restoring the acrylic's surface to its original laboratory luster. Start by smoothing all adjusted areas with a fine-grit silicone polisher or a rubber point. This initial step removes the deep striations left by carbide burs and prepares the material for the final high-shine phases. A smooth surface is significantly more resistant to biofilm buildup over time.
We view the finishing process as a collaborative effort to ensure long-term patient compliance. If a guard feels like a foreign object because of a rough edge, the patient is far less likely to wear it consistently. By taking an extra five minutes to refine the finish, you're protecting the patient's investment and your clinical reputation. If you are looking to elevate your practice with appliances that require minimal chairside time, consider our professional laboratory services for your next case.
The Multi-Step Polishing Sequence
Achieving a high-gloss finish requires a methodical transition through different abrasive levels. Don't skip steps, as each grit is designed to remove the marks left by the previous one. Use a wet rag wheel with pumice for the initial bulk polishing phase to level the surface. This is followed by a high-luster compound to restore that "lab-fresh" appearance. To maintain the integrity of the material, follow these guidelines:
- Transition from medium rubber wheels to fine points to remove all visible bur marks.
- Apply light, intermittent pressure and keep the appliance in constant motion to avoid overheating the acrylic.
- Ensure the transition between adjusted and non-adjusted areas is completely seamless to the tongue.
Final Inspection and Patient Hand-Off
The final step in this acrylic night guard adjustment guide is the physical and verbal hand-off. Run your finger along all edges, especially the lingual and labial borders, to check for any remaining sharpness. Once you're satisfied, demonstrate the proper insertion and removal techniques to the patient. It's vital they understand how to handle the appliance to avoid accidental breakage. Provide them with a protective case and clear instructions on daily maintenance. Remind them to use cool water and a soft brush for cleaning; hot water can distort the precision fit of the acrylic. This education ensures the polished surface remains intact and the guard stays hygienic for years to come.
Reducing Chairside Adjustments Through Lab-Clinician Collaboration
While this acrylic night guard adjustment guide focuses on chairside techniques, the most efficient adjustment is the one you don't have to make. Precision at the delivery appointment is a direct result of the quality of the initial records and the relationship you have with your laboratory. We view the lab-clinician bond as a collaborative partnership where clear data exchange eliminates the guesswork that leads to long, frustrating delivery appointments. By providing meticulous instructions on your lab slip, such as specific material thickness or a preferred occlusal scheme, you allow your lab to tailor the appliance to your clinical philosophy. Evaluating lab remakes as data points rather than just inconveniences can also help refine your communication and record-taking processes over time.
Choosing a reliable orthodontic lab that prioritizes craftsmanship and accuracy is your best defense against excessive chair time. When your lab partner understands your expectations, they can deliver an appliance that seats with that satisfying "snap" and requires only minor occlusal refinement. This synergy supports your practice's productivity and ensures your patients receive the highest standard of care without unnecessary time in the chair.
How Accurate Impressions Simplify Delivery
A perfect fit begins with a perfect impression. It's essential to capture the full palate and the retromolar pads to ensure the appliance's ultimate stability. We recommend using high-quality VPS materials or digital scans to eliminate the dimensional instability often seen with traditional alginate. Before sending the case, verify that your bite registration is taken at the desired vertical dimension of occlusion (VDO). If the lab has to guess the vertical clearance, you'll likely spend significant time grinding the occlusal surface to achieve a balanced bite. Accurate records are the foundation of a predictable delivery.
Leveraging Digital Workflows for Precision Fit
Transitioning to digital scans reduces the margin of error inherent in stone models, such as expansion or accidental chipping during the fabrication process. Utilizing 3d printed dental models ensures that the appliance is built on a stable, high-definition replica of the patient's dentition. When you work with a lab that employs CAD/CAM technology, you benefit from consistent acrylic density and a level of precision engineering that traditional hand-pouring can't always match. These modern workflows significantly reduce the need for internal adjustments, allowing you to focus your expertise on the final occlusal balancing.
Mastering the Path to Clinical Excellence
Achieving a perfectly balanced occlusal splint doesn't have to be a source of chairside frustration. By applying the techniques in this acrylic night guard adjustment guide, you can transform delivery appointments into streamlined, predictable procedures. Success is built on a foundation of methodical equilibration, careful internal troubleshooting, and a high-luster finish that ensures patient comfort. These steps don't just protect the dentition; they solidify your reputation for precision and care. We're here to support that mission by providing the meticulous craftsmanship your practice deserves.
Our US-based laboratory specializes in precision-engineered solutions for clinical efficacy, offering deep expertise in both dual laminate and hard acrylic appliances. We understand that your time is valuable, and we're committed to delivering appliances that seat with accuracy and require minimal refinement. Partner with Brightline Orthodontic Lab for precision-engineered night guards that minimize your chair time. We look forward to becoming a reliable extension of your clinical team and helping you achieve superior results for every patient.
Frequently Asked Questions
How do you identify high spots on an acrylic night guard?
Identify high spots by using a dual-color articulating paper system to differentiate between different types of contact. Use blue paper to mark centric contacts and red paper to highlight excursive or protrusive movements. Look specifically for "donuts," which are marks with a clear center and a dark outer ring. These markings indicate heavy, concentrated pressure that requires immediate reduction to achieve bilateral, simultaneous contact across the arch.
Can you adjust a dual laminate night guard the same way as a hard acrylic one?
You can adjust the hard occlusal surface of a dual laminate guard using standard carbide burs, just as you would with a hard acrylic appliance. However, you must avoid grinding the soft internal liner during the process. This flexible material cannot be polished back to its original state and may delaminate if thinned excessively. If the internal fit is too tight, try warming the guard in water first before considering any internal reduction.
What bur is best for adjusting occlusal splints?
Large, pear-shaped or tapered carbide burs are the most effective tools for bulk reduction on dental acrylic. These shapes allow for rapid material removal while maintaining excellent control over the surface contour. For the fine-tuning and smoothing phases, switch to silicone rubber points or "brownie" and "greenie" polishers. These specialized tools help remove deep bur marks and prepare the appliance for the final high-luster polishing wheel.
How much acrylic can safely be removed during adjustment?
Maintain a minimum thickness of 1.5mm to 2mm to preserve the structural integrity and longevity of the appliance. Removing too much material can lead to cracks or total appliance failure under heavy bruxing forces. If you find that achieving a balanced bite requires thinning the material beyond these limits, the initial bite registration may have been faulty. In such cases, it's safer to re-index the patient and have the appliance remade.
Why does my night guard feel tighter in the morning than at the chairside fitting?
This sensation is often caused by a minor orthodontic effect or the material's reaction to the oral environment overnight. Slight tooth movement is common when first wearing a new appliance. However, if the tightness persists or causes actual pain, use this acrylic night guard adjustment guide to re-evaluate the internal fit. You may need to identify and relieve specific internal undercuts or interproximal contact points to improve long-term patient comfort.
What is the best way to polish acrylic after adjustment?
Start with a medium rubber wheel to remove bur scratches, then transition to a fine rubber point for refinement. Use a wet rag wheel with pumice at the lab bench for the initial bulk polishing phase. Finish the process with a high-shine compound like Acrylustre to achieve a glass-like finish. This methodical sequence ensures the surface is smooth enough to resist bacterial accumulation while providing a professional, lab-fresh appearance for the patient.