
A perfect fit at the chairside isn't a matter of luck; it's the direct result of the engineering data you provide to your technician. When you sit down to draft a lab prescription for rapid palatal expander appliances, you're doing more than requesting a tool. You're designing a mechanical solution that must balance complex anatomical constraints with precise force delivery. With 30 to 45 percent of children worldwide requiring orthodontic treatment for issues like jaw misalignment, the need for efficient, high-quality expansion is constant.
We understand how frustrating it is when a "near-miss" fit leads to an avoidable remake or inconsistent clinical results. These delays don't just cost you time; they disrupt the trust you've built with your patients. This guide helps you master the technical nuances of RPE prescriptions to ensure a precision fit and optimal expansion every time. We'll walk through the essential data points for your digital or physical submissions, from selecting the right expansion screw to optimizing band seating, so you can reduce chairside adjustments and strengthen your partnership with the lab.
Key Takeaways
- Identify the essential components of a complete prescription to ensure your technician has the exact data needed for a successful build.
- Compare the clinical benefits of banded versus bonded RPE designs to match the right appliance to your patient’s specific orthodontic needs.
- Master technical specifications in your lab prescription for rapid palatal expander appliances, focusing on expansion screw capacity and rigid wire diameters.
- Learn how to optimize digital scan paths and capture the deep palate to guarantee a precision fit that eliminates appliance remakes.
- Streamline your clinical workflow by leveraging a collaborative partnership that prioritizes meticulous craftsmanship and modern digital integration.
Essential Components of an RPE Lab Prescription
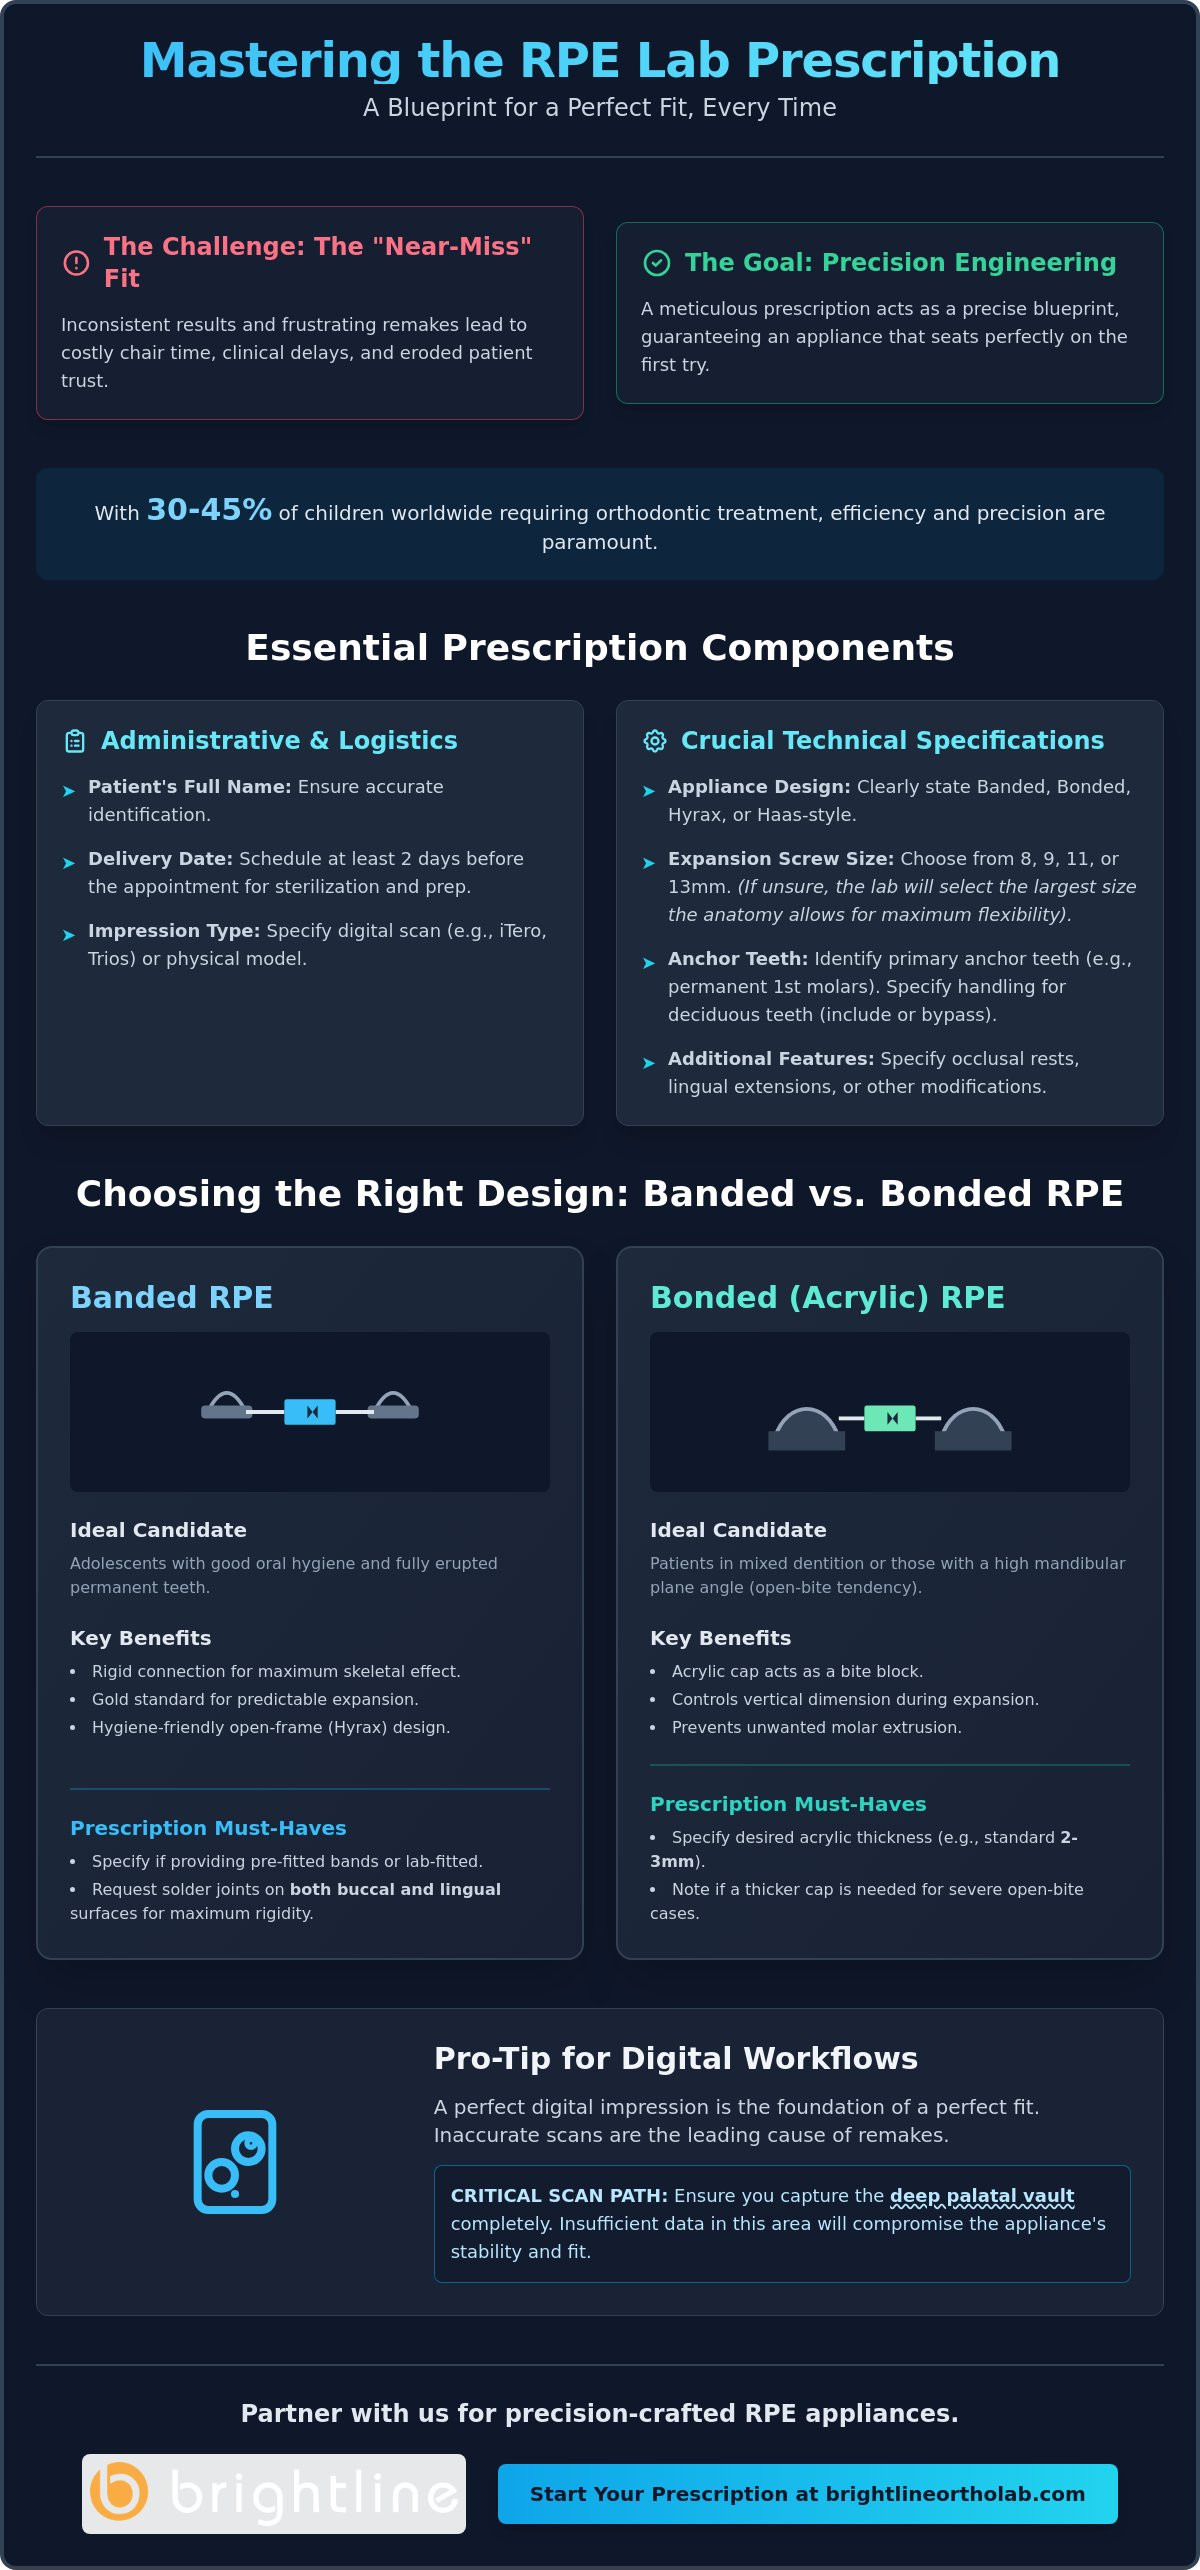
A successful clinical outcome begins with a meticulous blueprint. Your lab prescription for rapid palatal expander fabrication acts as the primary communication bridge between your chairside vision and our benchtop execution. Start with the basics. Include the patient's full name and a realistic delivery date that accounts for shipping and sterilization. We recommend scheduling the delivery at least two days before the appointment. This ensures everything is ready before the patient sits in your chair.
Beyond administrative data, specifying the expansion screw size is vital. Most cases utilize 8mm, 9mm, 11mm, or 13mm screws. Choosing the right size depends on the required millimeters of expansion and the patient's arch width. If you aren't sure which screw fits best, our technicians can recommend a size based on your provided models or scans. We'll always prioritize the largest screw the anatomy allows to provide you with maximum flexibility during treatment. A complete lab prescription for rapid palatal expander appliances should also include clear instructions for band placement, whether you're providing the bands or asking us to fit them from our inventory.
Defining the Primary Appliance Type
Choosing between a 2-arm and 4-arm design depends on the desired distribution of force. A 4-arm RPE provides higher stability and is often preferred for older patients with more resistant sutures. When deciding on the base design, consider the Hyrax for its hygiene-friendly open frame and direct skeletal effect. Alternatively, the Haas-style expander incorporates acrylic for tissue-borne support. This is a popular choice among various Palatal expansion techniques when clinicians want to distribute pressure across the palatal vault. You should also specify if you require a Bonded RPE, which we'll discuss in later sections, to ensure the design meets your vertical dimension goals.
Mandatory Tooth Specifications
Identify your anchor teeth clearly; these are usually the permanent first molars and first premolars. If you're working with a mixed dentition, specify how to handle deciduous teeth. Tell us if they should be bypassed or included in the design for extra stability. To ensure a precision fit, please include instructions for:
- Occlusal rests: Specify if you need additional support on the premolars or deciduous teeth.
- Lingual extensions: Note if you want the wire to extend to the canine to help with arch leveling.
- Band fitting: If you want the lab to fit the bands, please indicate the preferred brand or if we should use our standard high-quality stock.
Providing these details upfront eliminates the guesswork and helps us act as a true extension of your team, delivering an appliance that seats perfectly on the first try.
Choosing the Right Design: Banded vs. Bonded RPE
Selecting the correct appliance design is the most critical decision you'll make when filling out a lab prescription for rapid palatal expander fabrication. While both designs achieve expansion, they interact with the patient's anatomy and oral hygiene in fundamentally different ways. Making the wrong choice can lead to unwanted dental tipping or vertical height increases that complicate your finish. Your prescription must reflect the specific mechanical needs of the case to avoid mid-treatment surprises.
Prescribing the Banded RPE
The Banded RPE serves as the primary tool for adolescent palatal expansion, offering a rigid connection to the dentition for maximum skeletal effect. It remains the gold standard for patients with good hygiene and fully erupted permanent teeth. When you prescribe this version, clarify whether you're sending pre-fitted bands or if we should fit them from our stock. If we're fitting them, providing accurate 3D printed models or precise digital scans is non-negotiable. To ensure maximum rigidity, specify that you want solder joints on both the buccal and lingual surfaces of the bands. This prevents the appliance from flexing under the heavy forces required to open the mid-palatal suture.
Prescribing the Bonded (Acrylic) RPE
For patients in the mixed dentition stage or those with a high mandibular plane angle, a Bonded RPE is often the superior choice. The acrylic cap acts as a built-in bite block, which helps control vertical dimension and prevents unwanted molar extrusion during expansion. In your lab prescription for rapid palatal expander appliances, specify the desired acrylic thickness. A standard 2mm to 3mm thickness is usually sufficient for a bite-block effect, but you may need more for specific open-bite cases.
Be sure to indicate the coverage area clearly. Most clinicians prefer full occlusal and partial buccal coverage to ensure maximum surface area for bonding. We also recommend requesting debonding tabs in your prescription. These small additions make the eventual removal process much easier for you and more comfortable for the patient. If you're unsure which design best suits a complex case, our team at Brightline Orthodontic Lab is always available to consult on the engineering nuances of your design.
Identifying these clinical indications early prevents design errors that lead to remakes. A banded design offers the easiest hygiene path, while a bonded design provides the control needed for challenging vertical growth patterns. By being specific about these requirements, you ensure the appliance we build matches the clinical reality of your patient's mouth. This level of detail in your lab prescription for rapid palatal expander builds a foundation for predictable, high-quality results.
Technical Specifications: Expansion Screws and Wire Diameters
Once you've selected your appliance design, the engineering details determine its clinical performance. A precise lab prescription for rapid palatal expander fabrication must specify the hardware that will drive the expansion. These technical specs aren't just preferences; they're the mechanical foundation that ensures the force you apply is directed toward skeletal change rather than dental tipping. By getting granular with your wire and screw choices, you eliminate the flex that often leads to inconsistent results.
Always specify the orientation of the expansion screw arrows. Forward-facing arrows are generally preferred because they provide a clear visual cue for parents during activations. This simple choice reduces the risk of "lost" turns or backward activations that can stall treatment progress. Additionally, we recommend requesting 1.5mm stainless steel for the appliance arms. This heavy-gauge diameter is essential for maintaining rigidity. It prevents the appliance from bowing under the high-pressure loads required to successfully separate the mid-palatal suture.
Sizing the Expansion Screw
Matching the screw capacity to the patient's needs is a balancing act between anatomical space and required movement. Prescribe an 8mm or 9mm screw for younger patients or those with narrow arches where palatal real estate is limited. For significant maxillary constriction requiring 10mm or more of expansion, select an 11mm or 13mm screw. Don't prescribe a screw at its maximum limit. If you anticipate needing 8mm of expansion, choose at least a 9mm or 11mm screw. This safety margin ensures the appliance remains stable and doesn't "bottom out" or become loose at the end of the activation phase.
Wire Management and Rigidity
Requesting pre-bent arms in your lab prescription for rapid palatal expander orders significantly improves the accuracy of the fit. When arms are pre-bent to the precise anatomical angulation of the anchor teeth, the appliance seats with minimal tension. This reduces the need for aggressive chairside adjustments that can weaken the solder joints. You should also include instructions for soft tissue relief. We typically provide 1.5mm of clearance between the wire and the palatal mucosa. This space prevents the appliance from embedding into the tissue as the palate flattens during expansion. If the patient has a particularly deep or narrow vault, specify "step-up" wire bends to maintain this critical clearance without interfering with the tongue's resting position.
Rigid wire management is the secret to predictable expansion. By specifying heavy-gauge lingual wires and clear relief parameters, you create a stable environment for skeletal growth. These details transform a standard appliance into a custom-engineered solution that respects the patient's unique anatomy while delivering the force necessary for a successful clinical outcome.
Impression Requirements and Digital Workflow
High-quality fabrication depends entirely on the accuracy of the data you submit. Even the most meticulously designed appliance will fail if the underlying model doesn't reflect the patient's true anatomy. When you prepare a lab prescription for rapid palatal expander production, your primary goal is to provide a foundation that allows for a zero-remake fit. This starts with capturing every detail of the dentition and the supporting soft tissue.
The capture of the palatal vault is the single most important factor for RPE accuracy because the appliance must sit flush against the anatomy to deliver effective force. If the palate is "washed out" or distorted in your impression, the expansion screw may be positioned too low or too high, leading to tongue interference or tissue impingement. Whether you use physical materials or a digital scanner, prioritize the deep anatomy of the palate and the tuberosities to ensure a stable result.
Optimizing Digital Scans for RPE
Moving to a digital workflow simplifies communication but requires specific scan path optimization. Ensure your STL files capture the full anatomy of the palate and the clear margins of all anchor teeth. "Holes" in the digital mesh near the gingival margin can lead to ill-fitting bands or poorly adapted acrylic. If you're utilizing a digital-first approach, you can learn more about 3D printed dental models and how they integrate into modern orthodontic workflows. For the best results, verify that your scan includes the distal of the last erupted molars to help our technicians orient the appliance correctly.
Traditional Impression Pitfalls
If you prefer traditional methods, your stone pour-ups must be flawless. Bubbles around the gingival margin are the most common cause of lab remakes. If a bubble exists where a band or occlusal rest is supposed to sit, the appliance will not seat chairside. Use a rigid tray to prevent arch-width distortion and avoid "pulls" in the molar region of the impression. These minor distortions can lead to an appliance that is too narrow or too wide for the patient's actual arch.
Before you ship your models, verify the seating of any pre-fitted bands. If the bands rock or slide on the stone model, they'll behave the same way in the mouth. We recommend securing the bands to the model with a small amount of wax to ensure they don't shift during transit. Taking these extra steps in your lab prescription for rapid palatal expander workflow saves you significant chairside time later. If you're ready to experience a more precise digital or physical workflow, submit your next RPE case to our expert team for a meticulous fit evaluation.
Partnering with Brightline for Precision RPE Fabrication
A masterfully drafted lab prescription for rapid palatal expander appliances is only as effective as the laboratory that brings it to life. At Brightline Orthodontic Lab, we treat every Rx as a custom engineering project. We don't just follow instructions; we evaluate the mechanical integrity of the design to ensure it stands up to the rigors of clinical expansion. Our US-based facility is staffed by seasoned experts who understand that a fraction of a millimeter can be the difference between a successful seat and a frustrating remake.
Local fabrication matters because it allows for tighter quality control and faster, more reliable communication. We meticulously inspect every solder joint and wire bend before the appliance leaves our bench. This high-performance approach ensures that the craftsmanship matches the clinical precision you expect for your patients. When you partner with us, you're gaining an extension of your team that is dedicated to your success and your patient's comfort. We take pride in the longevity and accuracy of our work, knowing that our appliances are a direct reflection of your clinical standards.
Quality Assurance and Support
We believe that complex case planning shouldn't be a solitary task. If you're dealing with a unique anatomical challenge or a difficult mixed-dentition case, you have direct access to our technicians. We're here to help you refine your designs and troubleshoot potential issues before the fabrication begins. This collaborative process is a hallmark of a high-quality partnership. If you're evaluating your current laboratory relationships, you can see what to look for in an ortho lab partner to ensure your standards are being met. Our primary goal is always the same: reducing your chairside adjustments and maximizing appliance reliability.
Submitting Your Prescription
Getting started with our team is designed to be a seamless experience. Whether you prefer traditional paper forms or a fully digital workflow, we accommodate your practice's specific needs. Our digital portal allows for the instant upload of STL files, while our downloadable Rx forms provide a clear checklist to ensure no detail is missed in your lab prescription for rapid palatal expander submission. For a deeper understanding of the mechanics behind the devices we build, review our how RPE appliances work guide. This background helps you communicate the benefits of treatment to your patients with even greater confidence.
Precision is the standard at Brightline. We invite you to experience the difference that meticulous attention to detail makes in your clinical outcomes. Submit your RPE case to Brightline Orthodontic Lab today and let us help you deliver predictable, high-quality results for every patient in your care.
Elevate Your Clinical Results with Precision Engineering
Mastering the technical nuances of your appliance design ensures a precision fit and predictable skeletal expansion. By specifying the exact screw capacity and choosing between banded or bonded designs based on your patient's vertical needs, you eliminate the logistical stress of appliance remakes. Investing time in a detailed lab prescription for rapid palatal expander fabrication sets the stage for a seamless bonding appointment and a more efficient chairside experience.
Our US-based laboratory brings over 18 years of industry experience to every case, specializing in custom RPE and Hawley fabrication. We act as a reliable ally, supporting your practice with meticulous craftsmanship and modern digital adaptability. You don't have to navigate complex case planning alone when you have a seasoned expert as an extension of your team.
Ready to streamline your workflow and ensure zero lab remakes? Download Our Orthodontic Lab Prescription Forms today to start your next case with confidence. We look forward to helping you achieve the highest standards of care for your patients.
Frequently Asked Questions
What is the most common mistake on an RPE lab prescription?
The most frequent error is omitting the specific expansion screw size or failing to identify anchor teeth clearly. Without these details, our technicians must guess based on the model, which increases the risk of a poor fit. A complete lab prescription for rapid palatal expander appliances should always include the patient's name, the required delivery date, and specific instructions for band placement to ensure a seamless chairside experience.
Can I prescribe an RPE for a patient with missing premolars?
You can certainly prescribe an RPE for patients with missing premolars by utilizing alternative anchor points. In these cases, we often use lingual extensions or occlusal rests on the deciduous teeth or the permanent second molars to provide the necessary stability. Simply note the missing teeth on your Rx and specify which teeth you'd like to use for anchorage so we can engineer a custom solution that fits.
Should I send pre-fitted bands or have the lab fit them?
Both methods are effective, but having the lab fit the bands often results in a more precise solder joint. If you choose this route, please provide high-quality 3D printed models or digital scans so we can select the best-fitting band from our inventory. If you prefer to pre-fit bands yourself, ensure they are seated firmly on the model before shipping to prevent any shifting during transit.
How much expansion can I expect from an 11mm screw?
An 11mm screw provides up to 11mm of total expansion, but it's best to leave a safety margin of 1mm to 2mm. This prevents the screw from becoming unstable or completely separating at the end of the activation phase. If your treatment plan requires exactly 11mm of expansion, we recommend prescribing a 13mm screw to maintain appliance integrity throughout the entire course of treatment.
What is the difference between a 2-arm and a 4-arm RPE prescription?
A 4-arm RPE prescription offers significantly more rigidity and stability than a 2-arm design. We typically recommend the 4-arm version for adolescent or adult patients where the mid-palatal suture is more resistant. The additional arms help distribute the expansion forces more evenly across the dental arch, reducing the likelihood of unwanted tipping and ensuring that the force is directed toward skeletal change.
Can an RPE be fabricated from a digital scan?
Yes, we can fabricate a highly accurate appliance directly from a digital scan. Simply upload your STL files through our digital portal to begin the process. Digital workflows eliminate the distortions often found in physical impressions and allow us to use 3D printed models for a precision fit. This modern approach simplifies the lab prescription for rapid palatal expander orders and reduces the turnaround time for your practice.
How do I specify the activation schedule on the prescription?
You don't usually need to include the activation schedule for fabrication purposes, but you should specify if you want the lab to pre-activate the screw. Most clinicians prefer the screw to be fully closed upon delivery. If you have specific instructions for the patient's activation key or want a specific arrow orientation for easier home use, please include those details in the special instructions section of your prescription form.
What materials are used in Brightline RPE appliances?
We use high-quality, medical-grade stainless steel for all our expansion screws and wire components. This ensures maximum biocompatibility and strength during the expansion process. For bonded RPE designs, we utilize a durable, clear orthodontic acrylic that provides excellent vertical control and patient comfort. Every material we select is chosen for its longevity and its ability to support predictable clinical outcomes for your patients.