
The difference between a successful OSA treatment and a discarded device often comes down to a single millimeter of mandibular advancement. You've likely felt the hesitation that comes with titration, specifically the worry of over-advancing a patient into TMJ pain or the confusion of ensuring the screws are turned in the correct direction. Adjusting a dorsal appliance shouldn't feel like a high-stakes guessing game for you or your patient.
We understand that clinical success depends on precision and patient compliance. If you can provide a predictable path to comfort, then your patients are far more likely to stick with their therapy. This guide offers a methodical protocol to master the titration process, helping you achieve the ideal fit while protecting the patient's long-term joint health.
You'll learn the exact mechanics of screw rotation, how to troubleshoot common side effects like jaw fatigue, and how to explain home adjustments so clearly that your patients feel like partners in their own care. Let's refine your workflow and build the confidence that comes with expert appliance management.
Key Takeaways
- Understand the mechanical interaction between upper fins and lower blocks to ensure consistent mandibular protrusion and immediate patient comfort.
- Master a methodical protocol for adjusting a dorsal appliance to maximize airway patency while safeguarding the patient's TMJ health.
- Learn to identify and resolve common clinical challenges, such as screw maintenance and managing "morning bite" shifts with repositioning techniques.
- Discover how precision lab fabrication and high-quality acrylics reduce the risk of component failure and simplify your chairside workflow.
Understanding the Dorsal Appliance Mechanism
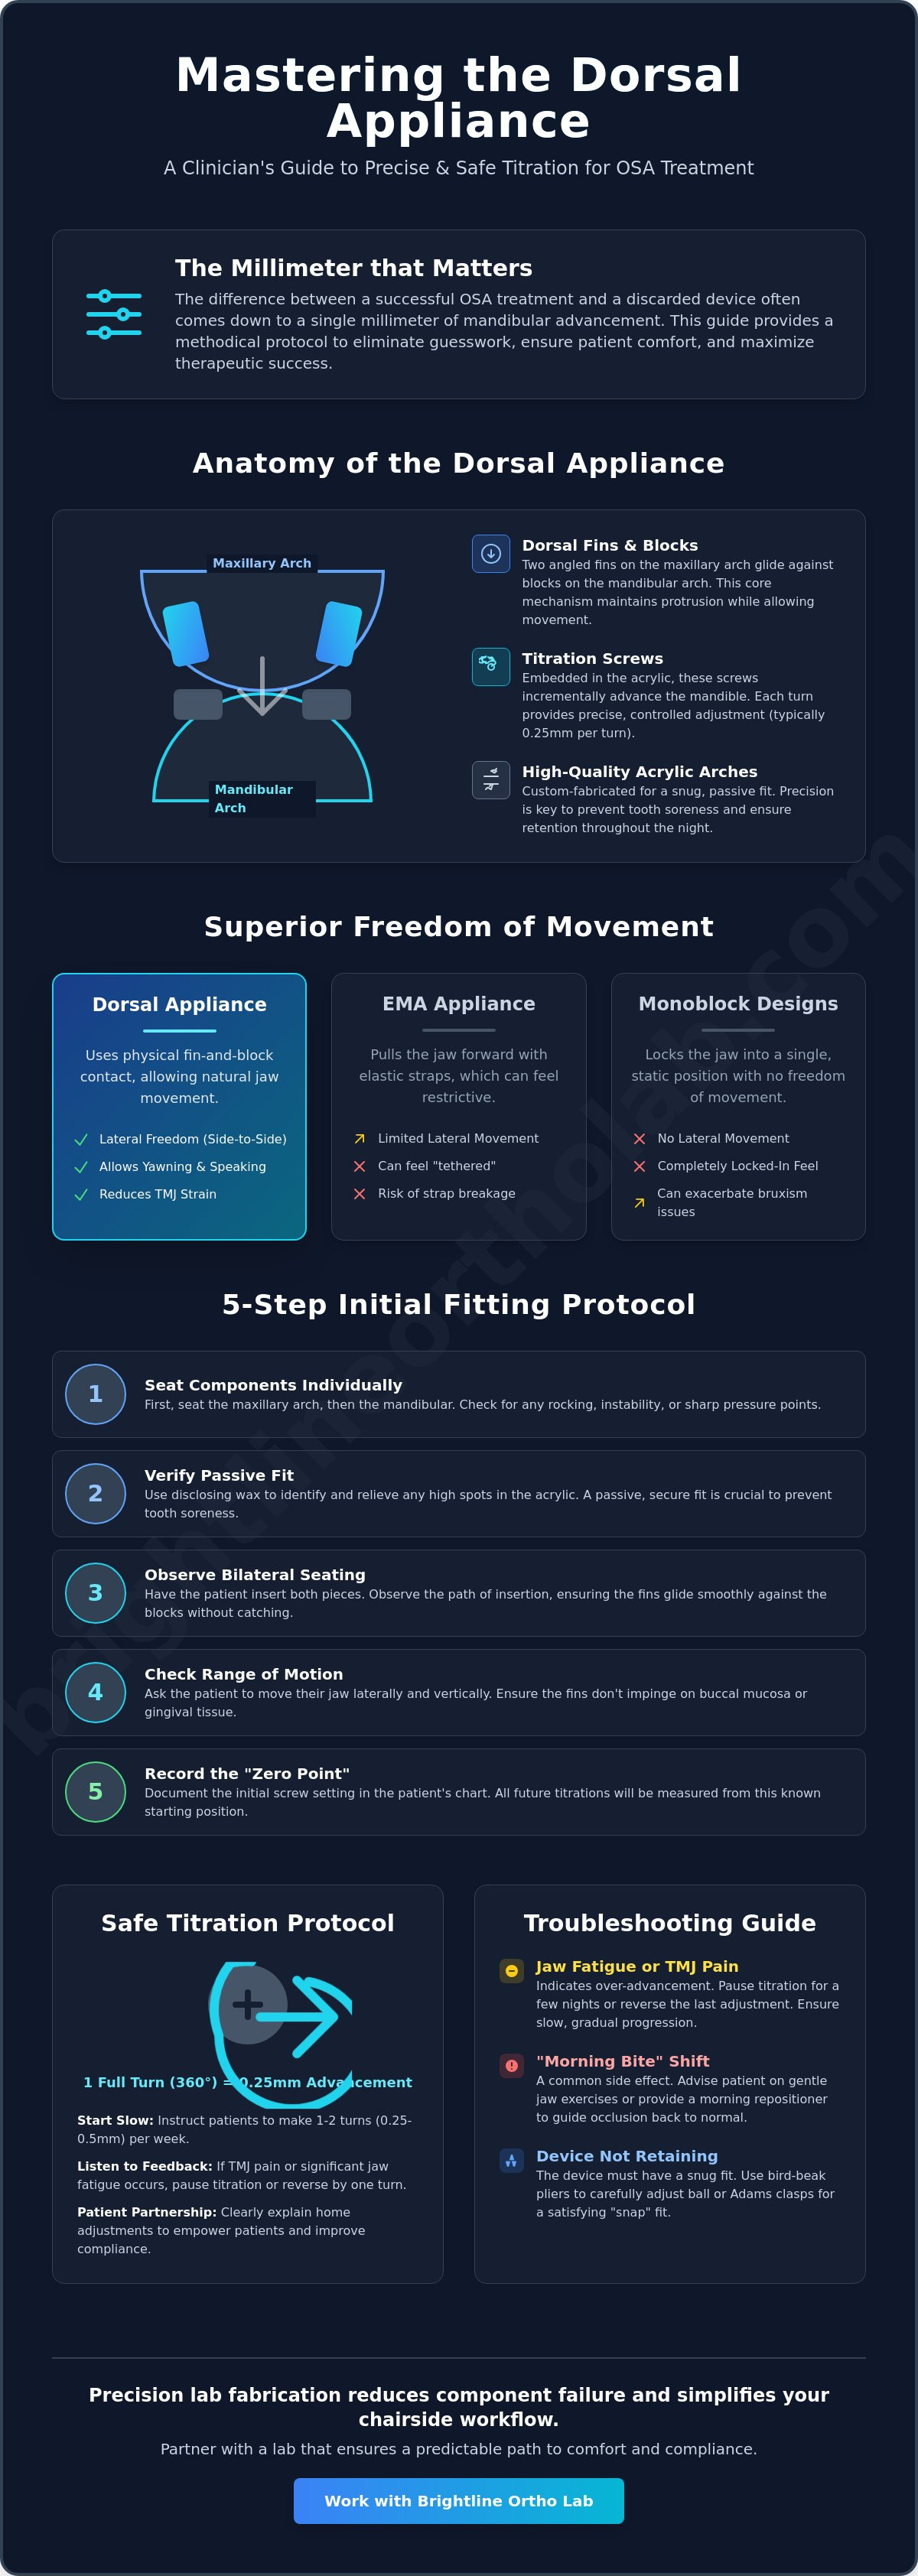
The Dorsal appliance represents a sophisticated evolution in the category of the Mandibular advancement splint. Unlike monoblock designs that lock the jaw into a static position, the Dorsal is a two-piece system. It works through a unique "fin and block" interaction. The maxillary component features two angled fins that glide against blocks built into the mandibular component. This design ensures the mandible remains in a protrusive state during sleep while allowing the patient to open their mouth or move their jaw side-to-side. If a patient is prone to nocturnal bruxism, this lateral freedom prevents the "locked-in" feeling that often leads to device rejection.
Clinicians often find that adjusting a dorsal appliance is more intuitive than managing complex hinge systems because the mechanics are visible and accessible. The design prioritizes both airway patency and joint health by allowing the jaw to move naturally within a controlled range.
Key Components of the Dorsal Design
Precision starts with the anatomy of the arches. Each piece is custom-milled or heat-cured to fit the patient's unique dentition, requiring high retention to resist the forces of protrusion. Meticulousness in the lab ensures these components work in harmony.
- Titration Screws: These are typically embedded within the upper or lower member. Turning these screws moves the fins or blocks, incrementally advancing the mandible. This is the core mechanism for adjusting a dorsal appliance to meet the patient's physiological needs.
- Fin Angle: The specific degree of the dorsal fins determines the starting point of advancement. A meticulously crafted angle ensures the transition into a protrusive state is smooth rather than jarring.
- Acrylic Arches: The fit must be snug but comfortable. We focus on ensuring the path of insertion is clear, as even a small discrepancy can lead to tooth soreness or lost retention.
Clinical Advantages for OSA Management
When comparing the Dorsal to other devices like the EMA appliance, the primary difference lies in the connection. While the EMA uses elastic straps to pull the jaw forward, the Dorsal uses physical contact between the arches. This makes it an excellent choice for patients who feel claustrophobic. They don't feel tethered or restricted in their movement. The ability to yawn or even speak without removing the device improves long-term compliance significantly.
The lateral freedom inherent in this design reduces the risk of TMJ discomfort during long-term use. You should consider a Dorsal appliance for patients with mild-to-moderate OSA who require a durable solution but struggle with the rigidity of traditional hinges. It's a reliable ally in your clinical toolkit, offering a balance of strength and patient-friendly flexibility that simplifies the management of sleep-disordered breathing.
Initial Fitting and Chairside Assessment
The initial seating of a Dorsal appliance is the most critical step in ensuring long-term patient compliance. Before you begin adjusting a dorsal appliance, you must verify that the baseplates fit passively and securely. Start by seating the maxillary component and then the mandibular component individually. Check for any rocking or instability. If the patient feels sharp pressure on specific teeth, use disclosing wax to identify and relieve high spots in the acrylic. This meticulousness at the start prevents the tooth soreness that often leads patients to stop treatment early.
Once the fit is verified, have the patient insert both pieces simultaneously. Observe the path of insertion as they do it themselves. You want to see that the fins glide smoothly into position against the blocks without catching. Ask the patient to move their jaw laterally and vertically while the device is in situ. While the Dorsal design allows for this freedom, ensure the fins don't impinge on the buccal mucosa or gingival tissue when the jaw moves. Confirming the baseline starting position is essential for tracking progress. Record the current screw setting in the patient's chart so all future titrations are measured from a known zero point, preventing any confusion during follow-up visits.
Evaluating Retention and Comfort
Retention is the foundation of effective oral appliance therapy for obstructive sleep apnea. If the device is too loose, it won't maintain protrusion; if it's too tight, the patient won't wear it. Adjust ball clasps or Adams clasps with bird-beak pliers to achieve a satisfying "snap" fit that stays in place throughout the night. Precision in these small adjustments makes the difference between a device that feels like a tool and one that feels like an extension of the patient's own body. If you encounter persistent fit issues, it may stem from the original impression or scan, which is why working with an expert orthodontic laboratory is vital for chairside ease.
Patient Education for Initial Wear
Take the time to teach the patient how to insert and remove the device properly. They should never "bite" the appliance into place, as this can distort the wirework or crack the acrylic. Warn them that they'll likely experience increased salivation and some morning jaw stiffness during the first week of wear. These are normal physiological responses as the muscles adapt. Finally, establish a cleaning routine. Instruct them to brush the appliance with a soft toothbrush and non-abrasive soap every morning to prevent biofilm buildup. Educating your patient on the mechanics of their device simplifies the process of adjusting a dorsal appliance during future titration appointments.
The Titration Protocol: Adjusting a Dorsal Appliance Safely
Successful titration is a marathon, not a sprint. When you begin adjusting a dorsal appliance, your primary goal is to find the minimum amount of advancement required to maintain an open airway while keeping the temporomandibular joint (TMJ) in a neutral, relaxed state. We recommend a "slow and steady" philosophy. Instruct your patient to remain at the baseline position for the first seven to ten nights. This adaptation period allows the muscles and ligaments to habituate to the presence of the device before any mechanical strain is introduced. If the patient reports that snoring persists or they still feel unrefreshed, you can then begin the advancement phase.
Advancement should happen in small, predictable increments. Monitor patient feedback closely during this time. You're looking for the "sweet spot" where snoring is significantly reduced or eliminated, but the patient doesn't experience persistent jaw fatigue. If they reach a point where their partner reports silence and their daytime sleepiness has vanished, stop the advancement. There's no clinical benefit to pushing the mandible further forward once the airway is stable; doing so only increases the risk of long-term dental shifts or joint discomfort.
Step-by-Step Screw Adjustment
Precision is the hallmark of professional titration. Every dorsal appliance features a titration screw housing, usually with a laser-etched arrow indicating the direction of advancement. Follow these steps to ensure accuracy:
- Identify the Direction: Always turn the screw in the direction of the arrow to move the mandible forward.
- Use the Adjustment Key: Insert the key fully into the screw head. A single quarter-turn typically provides 0.25mm of advancement.
- Maintain Symmetry: This is the most vital step. If you turn the left screw two times, you must turn the right screw exactly two times. Asymmetrical adjustment leads to a midline shift, which causes uneven loading on the TMJ and can lead to acute pain.
Monitoring Physiological Response
As you progress, perform a thorough clinical assessment of the TMJ at every follow-up. Check for new clicking, popping, or tenderness in the masseter muscles. While the Dorsal design offers more freedom than fixed devices, it still places tension on the supportive structures of the jaw. Many of the principles found in our EMA appliance titration guide apply here, particularly the emphasis on gradual movement to protect the joint.
If a patient experiences acute morning jaw pain that lasts for more than an hour after removing the device, it's a clear signal to back off. Instruct them to reverse the screws by one or two turns until the discomfort subsides. This responsive approach builds trust and ensures the patient doesn't abandon therapy. By adjusting a dorsal appliance with this level of meticulousness, you ensure the treatment remains both effective and sustainable for years to come.
Troubleshooting Common Adjustment Issues
Clinical success isn't just about following the initial setup; it's about managing the variables that arise during long-term use. While adjusting a dorsal appliance is usually straightforward, you'll occasionally encounter mechanical resistance or patient-specific side effects that require a technical solution rather than just encouragement. Distinguishing between a patient who is simply acclimating to the device and one who is experiencing a mechanical failure or physiological strain is essential for maintaining their trust and progress.
If you find that the titration screws have become difficult to turn, the culprit is often calcium buildup from saliva. This seizing can prevent the patient from advancing the device at home, leading to a plateau in their treatment. We recommend having the patient bring the device to every follow-up so you can inspect the hardware for debris. A quick cycle in an ultrasonic cleaner with a professional-grade tartrate and light stain remover usually restores smooth movement. If the screw remains seized, don't force it, as you risk stripping the housing or cracking the surrounding acrylic.
Mechanical and Fit Issues
Over months of use, a patient’s dentition may undergo subtle changes, or they might receive new restorative work. If the appliance loses its "snap" fit or begins to rock, check the internal aspect of the acrylic. You may need to relieve small areas to accommodate a new filling or crown. When it comes to the dorsal fins themselves, minor chips can be smoothed chairside with a white stone and a polishing wheel. However, if a fin shears off completely, it's usually a sign of heavy bruxism or an underlying structural fatigue. In these cases, the device should be returned to a reliable orthodontic laboratory for a professional repair to ensure the advancement geometry remains precise.
Managing Patient Side Effects
One of the most frequent complaints involves "morning bite" changes, where the patient feels their teeth don't meet correctly for the first 20 minutes after removal. This is often a result of the retrodiscal tissues becoming slightly engorged while the mandible is protruded. Providing a morning repositioner, such as a simple bite wafer or leaf gauge, helps the patient "reset" their occlusion through gentle isometric exercises.
It's also vital to monitor the soft tissue. If the dorsal fins are causing ulcerations in the buccal mucosa, you can often resolve this by slightly rounding the edges of the fins or adjusting the vertical dimension. If soreness persists despite these changes, review the indications for dorsal appliance therapy to ensure the patient's anatomy is still well-suited for this specific design. By proactively adjusting a dorsal appliance to meet these challenges, you prevent minor irritations from becoming reasons for treatment abandonment.
Ensuring Long-Term Efficacy with Lab Support
The clinical success of sleep therapy is built on a foundation of technical precision. While your skill in adjusting a dorsal appliance determines the patient's immediate comfort, the quality of the laboratory fabrication determines the device's longevity. A dorsal appliance is only as reliable as its weakest component. When you partner with a lab that prioritizes meticulousness, you reduce the likelihood of the mechanical failures, such as seized screws or fractured fins, that we discussed in previous sections. High-quality acrylics and medical-grade titration components ensure that the device remains a functional tool for years rather than a source of logistical stress for your office.
Modern digital workflows have transformed how we approach these complex cases. By utilizing 3D printed dental models, we can achieve a level of accuracy that traditional stone models simply can't match. This precision ensures that the path of insertion is perfect from day one, significantly reducing the chair time you spend relieving internal high spots. When the fit is accurate, the process of adjusting a dorsal appliance becomes a predictable, rewarding part of your clinical routine.
The Role of Precision Engineering
Every millimeter matters in mandibular advancement. Meticulous lab work ensures that the dorsal fins are set at the exact clinical angle required by your bite registration. If the angle is off even slightly, the interaction between the upper and lower components will feel "clunky" to the patient, leading to poor compliance. Using high-grade titration screws also prevents the stripping and seizing common in lower-quality devices. We focus on these technical details so you can focus on the patient's physiological response, knowing the hardware will perform exactly as intended.
Streamlining Your Sleep Practice
A successful sleep practice relies on efficiency and predictable outcomes. You shouldn't have to struggle with an appliance that doesn't fit at the initial seating. Receiving a device that snaps into place and glides smoothly into protrusion simplifies your entire workflow. It allows you to move directly into patient education and titration scheduling, rather than troubleshooting fabrication errors.
If you encounter a complex case with unique anatomical challenges, having access to technical support from your lab is invaluable. We act as an extension of your team, providing the expertise needed to manage difficult titration paths. We encourage you to learn what to look for in an ortho lab to ensure your partner's values align with your clinical goals. By choosing a partner committed to craftsmanship and modern technology, you ensure that every dorsal appliance you deliver is a reliable ally in your patient's journey toward better health.
Elevating Your Clinical Success in Sleep Therapy
Mastering the nuances of adjusting a dorsal appliance transforms a standard treatment into a life-changing solution for your patients. By prioritizing a methodical titration schedule and addressing mechanical issues before they lead to discomfort, you ensure the device remains a reliable tool for managing OSA. We've explored how a slow and steady approach protects the TMJ while maximizing airway patency, creating a foundation for long-term compliance and health.
Your clinical expertise deserves a partner that values precision as much as you do. Our technicians bring decades of industry experience to the bench, crafting sleep appliances that minimize chairside adjustments and maximize patient comfort. We offer national US support for orthodontic and sleep professionals, ensuring you have the technical backup needed for even the most complex cases. Our focus on meticulousness means you can spend less time troubleshooting hardware and more time focusing on patient outcomes.
Partner with Brightline Orthodontic Lab for precision-engineered Dorsal appliances today. We're ready to support your practice with meticulous craftsmanship and dependable service as you help your patients breathe easier every night.
Frequently Asked Questions
Which way do I turn the screw to advance a dorsal appliance?
Turn the titration screw in the direction of the laser-etched arrow located on the appliance housing. This action moves the dorsal fins or blocks forward, which in turn advances the mandible into the desired protrusive position. Always verify the direction visually before the patient leaves your office to ensure they don't accidentally reverse their treatment progress during home titration.
How many millimeters does each turn of the dorsal screw represent?
Each quarter-turn of the adjustment key typically represents 0.25mm of mandibular advancement. Because precision is vital when adjusting a dorsal appliance, you should instruct patients to count their turns carefully and keep a log. A full 360-degree rotation of the screw usually results in 1.0mm of total forward movement, allowing for very granular control over the airway opening.
What should I do if the patient experiences jaw pain during titration?
Instruct the patient to reverse the titration screws by one or two quarter-turns immediately if they experience acute or persistent jaw pain. This "backing off" period allows the TMJ and surrounding musculature to recover from excessive strain. Once the discomfort subsides, you can resume advancement at a slower pace, perhaps increasing the time between adjustments to two weeks instead of one to allow for better adaptation.
Can a dorsal appliance be adjusted to allow for more lateral movement?
The Dorsal design naturally allows for lateral and vertical movement because the upper and lower pieces aren't physically tethered. While you can't turn a screw to increase the side-to-side range, you can slightly reduce the height of the dorsal fins or the thickness of the mandibular blocks chairside. This modification provides more freedom for patients who brux heavily or feel restricted by the standard fin geometry.
How often should a patient return for titration follow-up appointments?
Schedule the first follow-up appointment within seven to ten days of the initial fitting to assess baseline comfort. During the active titration phase, seeing the patient every two to four weeks is standard to monitor progress and joint health. Once you reach the "sweet spot" of efficacy, transition to a six-month recall schedule to check the hardware for wear and verify that the airway remains stable.
What is the maximum amount of advancement possible with a dorsal appliance?
Most dorsal titration screws provide a total range of 5.0mm to 7.0mm of advancement from the starting position. If the patient requires more protrusion than the screw allows, you may need to reset the appliance in the lab or consider a different design. Always record the starting millimeter mark on the screw housing during the initial fit to track how much of the available range has been utilized.
Is it normal for the dorsal fins to feel tight against the cheeks initially?
It's common for patients to report a "full" feeling in the buccal vestibule during the first few nights of wear as the soft tissues acclimate. However, the fins shouldn't cause sharp pain or visible ulcerations on the mucosa. If adjusting a dorsal appliance doesn't resolve the tightness, you may need to lightly thin the external aspect of the acrylic fins chairside to create more room for the cheeks.
How do I clean the titration screws to prevent them from seizing?
Advise patients to clean the screw housing daily using a soft-bristled toothbrush and non-abrasive soap to prevent calcium buildup. This routine prevents the biofilm from hardening and seizing the mechanical components. During office visits, place the appliance in an ultrasonic cleaner with a tartrate-removing solution. This professional cleaning ensures the titration mechanism continues to move smoothly throughout the life of the device.