
A successful RPE appliance is actually engineered at the submission stage, not during fabrication. If the initial inputs are flawed, even the most meticulous laboratory technician can't produce a perfect fit. We understand how frustrating it is to deal with high remake rates or cases that are delayed because of missing prescription details. Mastering the specific lab requirements for RPE is the most effective way to eliminate these bottlenecks and protect your clinical schedule from unnecessary interruptions.
You deserve a laboratory partner that acts as a reliable extension of your team, not a source of logistical stress. We've developed this guide to help you master the essential submission criteria for both banded and bonded appliances. By following this clear, repeatable checklist, you'll ensure first-time fit accuracy and take advantage of faster turnaround times, such as our standard five business day in-lab window. We'll walk you through everything from digital scan protocols for systems like iTero or MEDIT Link to the specific anatomical landmarks we need to see to guarantee a precision result for your patient.
Key Takeaways
- Master the essential lab requirements for RPE to ensure your scans capture the full palatal vault and gingival margins necessary for a precision fit.
- Reduce your remake rates by using a standardized prescription checklist that clarifies hardware specs for both banded and bonded designs.
- Eliminate delivery day adjustments by implementing specific bite registration protocols that account for appliance thickness and expansion force.
- Optimize your practice's turnaround times by adopting a digital workflow that integrates seamlessly with advanced 3D printing and fabrication standards.
Beyond the Impression: Why RPE Lab Requirements Dictate Clinical Success
Successful clinical outcomes aren't just a result of your chairside technique. They depend heavily on the initial data you provide to your laboratory. Understanding the specific lab requirements for RPE ensures that every appliance we fabricate delivers the precise orthodontic forces your treatment plan demands. When you submit a case, you're providing the architectural blueprint for a device that must withstand significant pressure to achieve orthopedic changes. If the blueprint is flawed, the final structure will inevitably fail.
To understand why precision is non-negotiable, consider how RPE appliances work. The goal of Palatal expansion is to separate the mid-palatal suture by applying lateral pressure to the maxillary halves. If the appliance lacks rigidity due to a poor impression or scan, that force won't translate to the bone. Instead, it dissipates into the soft tissue or causes unwanted dental tipping. This is why our "Golden Rule" is simple: data quality equals appliance quality. We can only build to the level of detail you provide.
Remakes are more than just a logistical headache. They represent significant hidden costs for your practice. Every time an appliance doesn't fit, you lose valuable chair time, waste materials, and potentially damage patient trust. A case that requires a remake effectively doubles your overhead while delaying the patient's progress. By prioritizing the lab requirements for RPE at the start, you protect your bottom line and your reputation as a provider who values efficiency and accuracy.
The Anatomy of a High-Quality RPE Submission
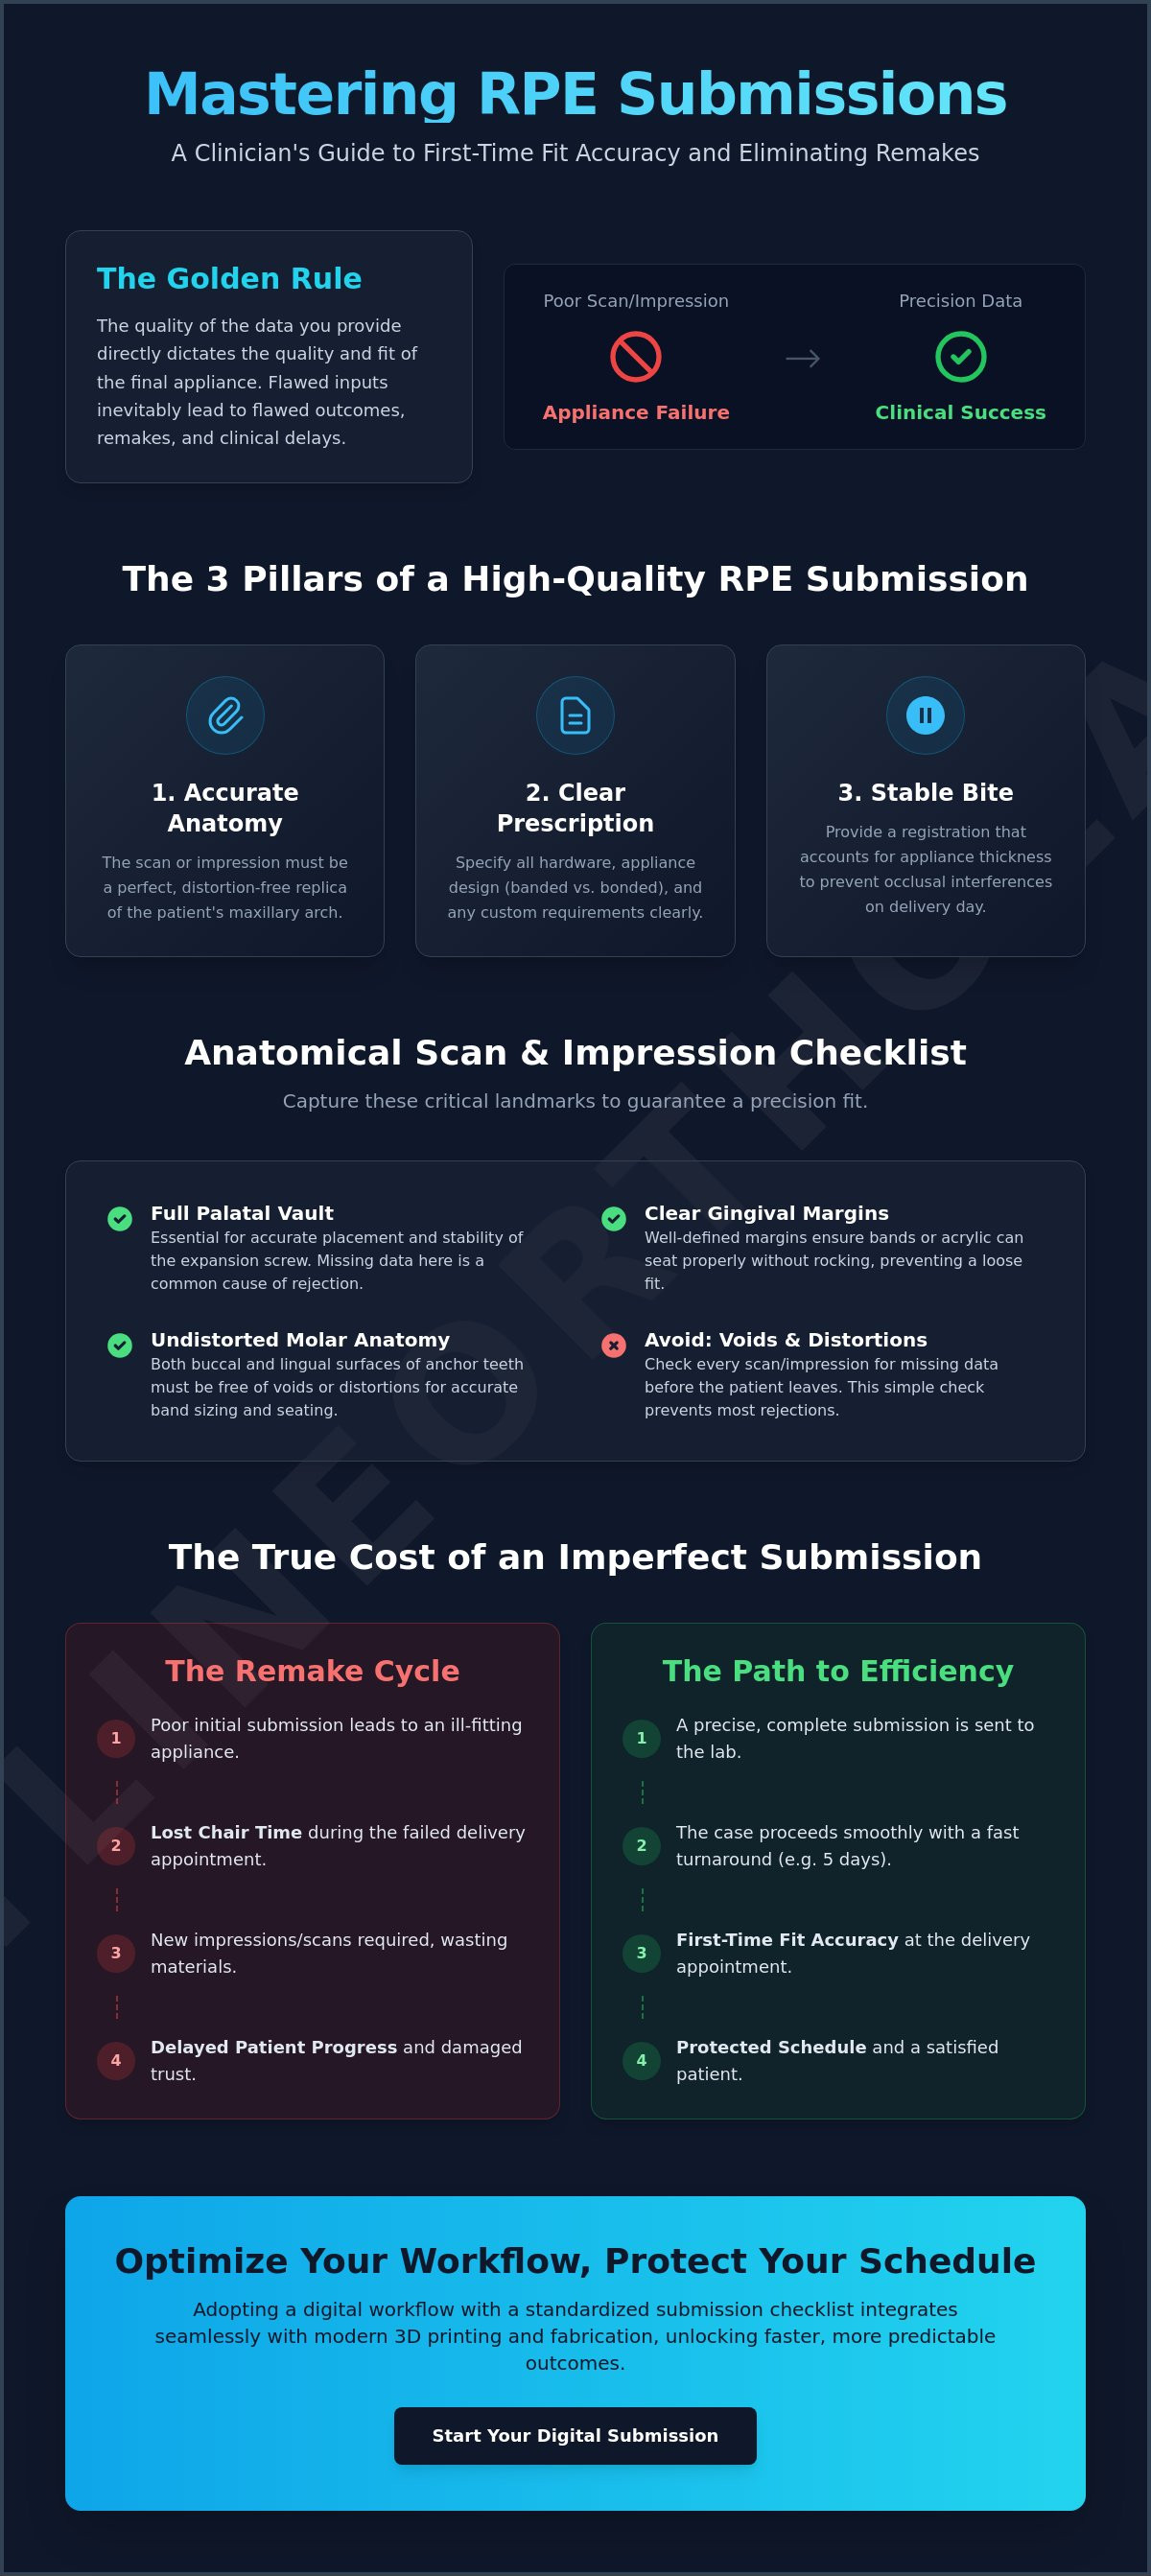
A successful submission rests on three distinct pillars: accurate anatomy, a clear prescription, and a stable bite registration. We often see cases where "good enough" records lead to lateral force inconsistencies. If the gingival margins aren't clearly defined, the bands or acrylic won't seat properly, leading to a loose fit. You should set clear expectations for your clinical staff: every scan or impression must be checked for voids and distortions before the patient leaves the chair. This meticulousness prevents the frustration of a rejected case or a poorly fitting appliance.
The Impact of Precision on Maxillary Expansion
Precision directly dictates how the appliance interacts with the dentition. If a band is even slightly misaligned, it can lead to tipping instead of the skeletal expansion you intended. High-quality models ensure the expansion screw remains stable during activation, preventing the appliance from flexing under load. Accurate maxillary records are the essential foundation of any arch expander because they dictate the trajectory of every millimeter of expansion. When the fit is perfect, the force is directed exactly where it needs to go.
Precision Input: Digital Scans and Physical Impression Standards
The quality of your case submission is the single biggest factor in the final fit of the appliance. Whether you use a digital scanner or traditional silicone, the lab requirements for RPE demand a complete representation of the patient's anatomy. We need more than just the teeth. To engineer an expander that won't rock or dislodge, we require a clear view of the full palatal vault and the gingival margins. If the palate is missing from the scan or impression, we can't accurately position the expansion screw, which compromises the entire treatment.
Molar anatomy is equally critical. Any distortion on the lingual or buccal surfaces of the anchor teeth makes it impossible to size bands accurately. Modern labs have largely transitioned to using 3d printed dental models to maintain this level of detail throughout the fabrication process. This technology allows us to replicate your patient's mouth with micron-level precision, but it still relies on the data you provide. If you have questions about your specific equipment, you can reach out through our digital submission portal for technical guidance.
Digital Workflow: STL File Requirements
Digital scanning has simplified the submission process, but it requires a specific technique for RPEs. You must capture at least 2-3mm of gingival tissue beyond the cervical line of every tooth in the arch. This ensures that the appliance rests comfortably and securely. Before you export the STL file, verify the scan density. Look for "holes" or transparent patches in the maxillary arch, especially in the deep areas of the palate. If your scanner, such as an iTero, MEDIT Link, DS Core, or 3Shape, shows gaps, rescan those areas immediately. Name your files clearly with the patient's full name and the arch type to help us move your case into production faster.
Analog Workflow: Alginate and Silicone Standards
If you prefer traditional impressions, your choice of materials and trays matters. Select a tray size that provides enough clearance to avoid palatal impingement; a tray that's too small will distort the very anatomy we need. For local cases, high-quality alginate is sufficient if poured immediately. However, if you're shipping across the country, use PVS or silicone. These materials offer superior dimensional stability and won't shrink or warp during transit. Always wrap your impressions in a damp paper towel and seal them in a plastic bag to prevent dehydration. This ensures the lab requirements for RPE are met before the package even leaves your office.
The Master RPE Prescription Checklist: Hardware and Design Specs
A clear, detailed prescription is the bridge between your clinical vision and our laboratory's execution. While the impression provides the anatomy, the prescription provides the engineering instructions. To meet the lab requirements for RPE, your lab slip must be exhaustive. Missing information often leads to phone calls that delay production or, worse, assumptions that lead to a poor clinical fit. Treat the prescription as a formal contract of design that specifies exactly how the appliance should behave under load.
One of the first decisions you'll record is the appliance type. Your choice between banded RPE vs bonded RPE dictates the entire fabrication process. Banded appliances offer superior hygiene and are easier to monitor, while bonded designs provide occlusal coverage and help manage vertical dimension. Beyond the base design, your prescription should always include:
- The specific expansion screw size (8mm, 10mm, or 12mm)
- Preference for screw type (Hyrax, Haas, or Memory)
- Detailed location for auxiliary attachments like facemask hooks or habit wires
- Specific teeth for band placement or occlusal rests
- Desired acrylic thickness for bonded designs
Precision in these details ensures the appliance functions as intended. For example, specifying an 8mm screw for a very narrow arch prevents the hardware from interfering with the palatal tissue, whereas a 12mm screw is necessary for cases requiring significant orthopedic change. If you don't specify a size, our technicians will select the largest screw the anatomy can accommodate, which may not always align with your comfort level for the patient.
Specifying Hardware and Screw Options
Choosing the right hardware is essential for patient compliance and clinical success. We offer Hyrax screws for a hygienic, all-metal design, or Haas-style screws if you prefer a tissue-borne component to distribute force. If your case requires constant, light force, specify a Memory screw. Always include your activation protocol on the slip. If you want us to set the screw to a specific starting point or include a pre-set number of turns, we'll accommodate that to simplify your chairside delivery. Clearly define your arm length and contouring preferences; we can keep arms close to the palate for comfort or stand them off to facilitate better cleaning.
Band and Acrylic Specifications
If you're using pre-fit bands, please indicate the exact sizes on the prescription and ensure they're seated firmly in your impression. For digital cases, we use your scans to size bands with high accuracy. When ordering a bonded RPE, you must specify the occlusal coverage thickness. Most clinicians prefer 2mm to 3mm of acrylic to manage the bite during expansion. While we focus on clinical utility, we also offer various color and customization options. These small details can significantly improve a young patient's enthusiasm for the treatment without compromising the lab requirements for RPE.
Bite Registration and Verification: Eliminating Delivery Day Adjustments
The most frustrating delivery day is one where the appliance simply won't seat or requires extensive grinding to clear the occlusion. Most of these issues stem from a lack of functional data during the design phase. To satisfy the lab requirements for RPE, you must provide a registration that captures the exact relationship between the maxillary and mandibular arches. This is especially critical for bonded designs where the acrylic thickness acts as a built-in bite block. Without a precise registration, we're forced to estimate the clearance needed, which often leads to heavy adjustments chairside or an appliance that feels "high" to the patient.
We recommend a centric relation bite for most cases. This provides a repeatable reference point that allows our technicians to engineer the expansion screw and support arms without interfering with the opposing dentition. If you're ready to experience a more streamlined submission process, view our digital case requirements and start your next case with us today. By providing this extra layer of data, you ensure that the appliance we build in the lab is the same one that seats perfectly in the mouth.
Bite Registration Techniques for Expansion
Capturing the vertical dimension is the primary goal for bonded appliances. While wax bites are a traditional choice, they often fail due to distortion during shipping or inaccuracies during the cooling process. We strongly suggest using a high-quality silicone registration material. Silicone provides superior dimensional stability and won't compress when we mount your models. If you're working digitally, verify the bite on your scanner's screen before finalizing the file. Ensure there's no "ghosting" or overlapping of the arches, as these digital artifacts will translate into a poorly fitting appliance.
Pre-Fabrication Verification Steps
Our collaborative process includes a rigorous verification stage before we ever bend a wire or print a model. We check your scans or impressions for undercuts and interferences that might block the path of insertion. Using our "Digital Fit Test," we can virtually seat the RPE on your 3D models to identify potential trouble spots in advance. If we find an issue, we'll reach out to discuss a design modification rather than sending you an appliance that won't work. A successful treatment plan and RPE activation instructions for clinicians start with a perfectly seated appliance.
Streamlining Your Workflow with Brightline Orthodontic Lab
Choosing a laboratory isn't just about finding a vendor; it's about selecting a partner that understands the high stakes of your clinical outcomes. At Brightline Orthodontic Lab, we've designed our entire workflow to simplify the complex lab requirements for RPE cases. We recognize that your time is best spent with patients, not troubleshooting appliance fit issues or managing remakes. By combining traditional craftsmanship with modern digital capabilities, we provide the reliability you need to maintain a productive schedule and a stress-free delivery day.
Our engineering standards are built on a foundation of meticulousness. We don't just fabricate appliances; we engineer solutions that respect the biological and mechanical requirements of maxillary expansion. Whether you're submitting a digital scan or a physical impression, our team treats every case with a level of attention that reflects our "extension of your team" philosophy. We're proud of our history of reliability, and we remain focused on the future and the immediate needs of our clinical partners.
Our Precision Engineering Process
Accuracy begins with the model. We utilize advanced 3D printing technology to create highly detailed 3D Printed Models, ensuring that the foundation of your RPE is flawless. This digital precision eliminates the minor dimensional changes often found in traditional stone models. Our master technicians then review every prescription to verify hardware compatibility and design feasibility. If we spot a potential issue with band sizing or screw placement, we'll consult with you before production begins. We use only high-quality, biocompatible materials that meet strict safety standards, giving you peace of mind that every appliance is as safe as it is effective.
Getting Started: Your First RPE Case
We've made it simple to integrate our services into your existing clinical routine. To begin, visit our clinician portal to download our standardized lab slips. These forms are designed to prompt you for all the critical data points we've discussed, from screw sizes to auxiliary attachments. If you use a digital scanner like iTero, MEDIT Link, DS Core, or 3Shape, you can upload your STL files directly through our secure portal. For those who prefer analog records, we provide clear instructions on how to package and ship your physical models to prevent damage. We also simplify your administrative tasks by billing monthly via QuickBooks, with invoices sent around the 5th of each month for the previous month's cases.
If you have questions about a complex case or need a consultation on a specific design, our clinical support team is readily available. We're here to support, simplify, and accommodate your practice's unique needs. We invite you to experience the "Brightline Difference" and see how a commitment to precision can transform your lab requirements for RPE from a logistical hurdle into a routine success.
Master Your RPE Workflow for Predictable Results
Success with maxillary expansion starts long before the appliance reaches your office. By mastering the specific lab requirements for RPE, you eliminate the guesswork that leads to clinical delays and patient frustration. Remember that capturing the full palatal vault and providing a stable bite registration are the most effective ways to ensure a first-time fit. These small steps in the submission phase translate directly into more predictable expansion and fewer chairside adjustments.
You don't have to manage these logistical details alone. Brightline Orthodontic Lab supports your practice with over 18 years of industry expertise and a full digital workflow integration for modern efficiency. Our precision-engineered, US-made appliances are designed to be an extension of your high clinical standards. Ready to submit your next RPE case? Download our precision lab slip today. We look forward to partnering with you to streamline your workflow and deliver exceptional results for your patients.
Frequently Asked Questions
What are the minimum scan requirements for a bonded RPE?
You must capture the entire palatal vault and at least 2-3mm of gingival tissue beyond the cervical line of every tooth. This ensures the bonded acrylic has a stable, accurate foundation and doesn't impinge on soft tissue. If the scan is shallow or missing the deep palate, we won't be able to position the expansion screw with the necessary precision.
Do I need to send a lower arch impression for a maxillary expander?
Yes, always provide a lower arch impression or scan for every case. We need the opposing data to verify occlusal clearance and engineer the support arms to avoid heavy interferences. Sending both arches is a standard part of the lab requirements for RPE that helps us prevent delivery day adjustments.
What is the standard turnaround time for a custom RPE?
Our standard in-lab turnaround time is 5 business days for all custom appliances. This efficient window allows us to maintain meticulous quality control while helping you keep your patient's treatment on track. We also offer rush options if your clinical schedule requires a faster delivery.
Can I submit STL files from any intraoral scanner?
We accept digital files from all major open systems, including iTero, MEDIT Link, DS Core, and 3Shape. Simply upload your STL files through our secure clinician portal to move your case into production. Digital submissions help satisfy lab requirements for RPE by providing high-resolution data that integrates directly with our 3D printing workflow.
How do I specify the expansion screw size on the lab slip?
Indicate your preferred screw size—typically 8mm, 10mm, or 12mm—in the hardware section of our lab slip. If you don't specify a size, our technicians will select the largest screw that the patient's anatomy can comfortably accommodate. You can also note preferences for specific screw types, such as Hyrax or Haas, in the same section.
What happens if the appliance doesn't fit on delivery day?
Contact our clinical support team immediately if you encounter a fit issue chairside. We'll review your original submission data alongside your clinical feedback to determine if the issue was caused by a distorted record or a design conflict. We pride ourselves on being a reliable ally and will work quickly to rectify the situation and support your patient's needs.
Is a bite registration mandatory for all RPE cases?
A bite registration is mandatory for all bonded RPE designs and highly recommended for banded ones. It allows our technicians to mount your models in the correct vertical dimension, which is essential for engineering the occlusal coverage. Without a bite, we're forced to estimate the clearance, which often leads to heavy adjustments during delivery.
Can the lab pre-size bands if I don't have a band kit?
Yes, we can accurately pre-size bands using your digital scans or physical impressions. Our technicians use your patient's anatomical data to select the best-fitting bands for the anchor teeth. This service simplifies your chairside workflow and ensures that the finished appliance seats securely with a precision fit.