
How many times has a routine delivery appointment turned into a thirty-minute battle with acrylic burs and pressure indicator paste? We understand that nothing drains your clinic’s productivity quite like an appliance that refuses to seat properly on the first try. It’s frustrating for you, it’s discouraging for your patient, and it often leads to those high remake rates that quietly inflate your overhead. Mastering the art of troubleshooting night guard fit is the most effective way to reclaim your schedule and restore your confidence in every delivery.
We believe that your laboratory should feel like a reliable extension of your own team, providing the meticulous precision you need to avoid these common chairside hurdles. In this guide, we'll help you quickly identify the root cause of common fit issues, from minor material distortions to structural fabrication errors. You'll learn exactly when to reach for your handpiece and when it's more efficient to request a remake. By the end of this article, you'll have a clear, clinical roadmap for achieving a perfect "snap-in" fit every time, ensuring your patients receive the comfort they deserve while you minimize wasted chair time.
Key Takeaways
- Define the clinical standard for a "snap-in" fit to ensure patient comfort and long-term compliance without excessive pressure on the periodontium.
- Master a methodical approach to troubleshooting night guard fit by distinguishing between minor material distortions and structural fabrication errors.
- Identify when to utilize chairside techniques like the "warm water" method versus when a full laboratory remake is the most efficient clinical path.
- Optimize your lab submissions through superior impression material selection and digital scanning best practices to achieve precision results every time.
- Leverage a collaborative partnership with your lab to reduce chairside time and minimize the overhead costs associated with frequent adjustments.
Defining the Clinical Standard for a Precise Night Guard Fit
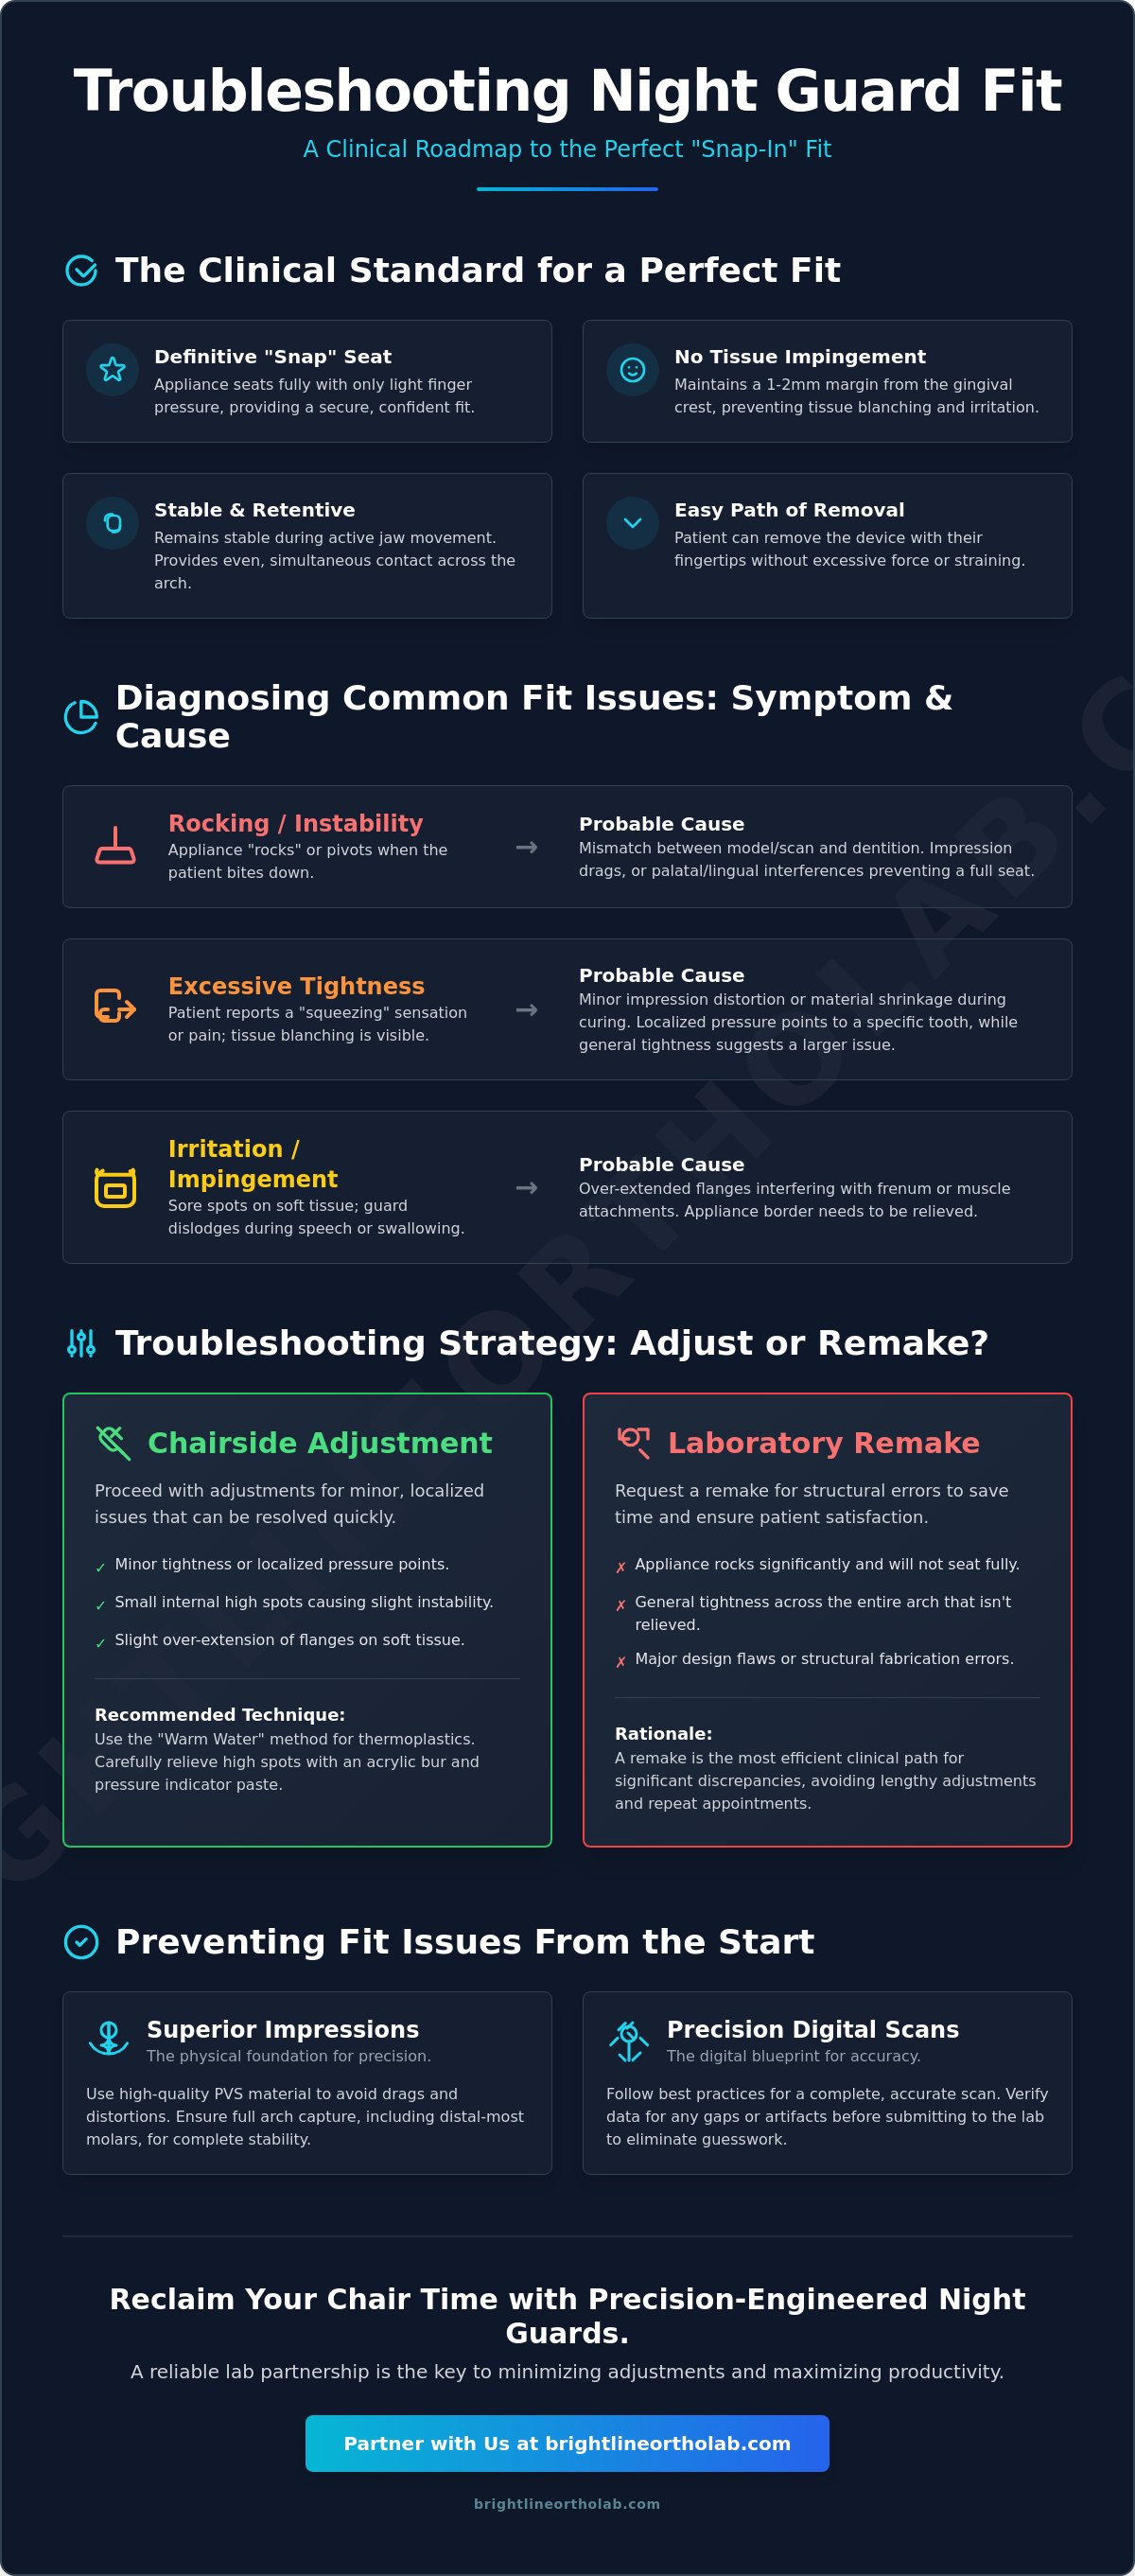
Clinical success begins with a clear definition of what constitutes a "perfect" fit. Before you can begin troubleshooting night guard fit issues, you must establish a baseline for acceptable retention and stability. A high-quality appliance should seat with a definitive "snap" that provides the patient with a sense of security, yet it must not exert excessive force on the periodontium. If a patient describes a sensation of "tightness" that borders on pain, or if you notice blanching of the gingival tissues upon insertion, the appliance is likely engaging too deeply into undercuts or lacks the necessary internal relief.
We recommend performing the "Snap-In" test during every delivery. The guard should seat fully with light finger pressure and remain stable during active jaw movement. Stability also relies on proper soft tissue clearance. Maintaining a 1-2mm margin from the gingival crest is essential to prevent chronic irritation or recession. Occlusal splints that impinge on the soft tissue often lead to poor compliance, as patients will instinctively remove the device during the night to seek relief from the discomfort.
The Balance of Retention and Patient Compliance
Retention is a delicate balance. While a retentive "click" confirms the appliance is secure, damaging pressure is a common cause of treatment failure. If a guard is too tight, it can lead to significant morning tooth soreness or even minor orthodontic shifts over time. This often happens when the path of insertion isn't clearly defined or when the appliance engages buccal undercuts too aggressively. You want the patient to be able to remove the device easily using their fingertips without straining their fingernails or risking damage to the appliance. A smooth path of insertion ensures that the patient feels confident using the guard every single night.
Occlusal Stability and Arch Coverage
Achieving a flat, stable biting surface is critical for preventing TMJ strain and muscle fatigue. You must verify that the guard provides even, simultaneous contact across the entire arch in centric relation. If the guard "rocks" when the patient bites down, it usually indicates a discrepancy between the model and the oral environment, or perhaps a missed distal-most molar. Ensuring full coverage of the second or third molars is vital; leaving these teeth unsupported can lead to over-eruption or appliance instability. For a deeper look at selecting the right design for specific patient needs, refer to our comprehensive occlusal guard guide. Proper arch coverage doesn't just protect the teeth; it balances the entire masticatory system.
Common Fit Issues and Their Clinical Root Causes
When you begin troubleshooting night guard fit, you'll likely encounter four primary complaints: rocking, tightness, irritation, or excessive bulk. Each symptom points toward a specific technical or clinical discrepancy that requires a targeted solution. Understanding the "why" behind these issues allows you to address the root cause rather than just treating the symptoms chairside.
Rocking or instability is perhaps the most common frustration. It typically indicates a mismatch between the stone model or digital scan and the patient's current dentition. Even a tiny "drag" in a PVS impression can create a high spot on the internal surface of the appliance that prevents a stable seat. Similarly, excessive tightness often stems from material shrinkage during the curing process or minor impression distortion. If the patient feels pressure on just one or two teeth, it's likely a localized distortion. However, if the entire arch feels squeezed, it may be a material calibration issue from the lab.
Impingement and speech issues are often related to the design of the appliance borders and the vertical dimension of occlusion (VDO). Over-extended flanges will interfere with the frenum or muscle attachments, causing the guard to dislodge when the patient speaks or swallows. If a patient complains of a "bulky" feel, it usually indicates an excessive increase in the VDO. While some opening is necessary to protect the teeth, too much can lead to muscle strain and significant speech impediments.
Diagnosing the "Rocking" Appliance
Instability is frequently caused by palatal or lingual interferences in the appliance base. Check these areas for any excess material that might be preventing a full seat. You should also examine the original impression for subtle "pulls" that might have occurred if the tray was moved before the material fully set. If the patient has had a new crown or even a large composite restoration since the impression was taken, the appliance will almost certainly rock. In these cases, a new scan is usually the most reliable path forward. If you find yourself spending more than ten minutes on these adjustments, it might be time to partner with a lab that prioritizes meticulous accuracy from the start. Our team at Brightline Orthodontic Lab works as a reliable extension of your practice to ensure every appliance meets your clinical standards.
Soft Tissue Irritation and Border Length
Look for localized blanching of the gingiva when the patient first inserts the guard. This is a clear sign of impingement. Over-extended borders can be particularly troublesome near the buccal frena and can lead to chronic soreness. We suggest using pressure-indicating paste (PIP) or a similar marking medium to visualize exactly where the high spots are. This allows for precise chairside adjustment of occlusal appliances, ensuring you only remove material where it is truly necessary to restore comfort.
Troubleshooting Strategy: Chairside Relief vs. Lab Remakes
Deciding whether to reach for a bur or a new impression tray is the hallmark of an efficient clinician. When you're troubleshooting night guard fit, time is your most valuable asset. Minor discrepancies, such as slight pressure on a single tooth or a border that's a fraction too long, are easily handled chairside. However, attempting to "grind" your way out of a major fabrication error often leads to a compromised appliance and a frustrated patient. You need a clear protocol to distinguish between a quick fix and a terminal failure.
For thermoplastic materials and dual-laminate guards, the "warm water" technique is a reliable first step. Submerging the guard in warm water for about thirty seconds can soften the internal liner just enough to allow it to seat over minor bony undercuts or slightly rotated teeth. This simple adjustment often resolves "tightness" complaints without removing any material. Your choice of material plays a huge role here; a hard vs soft night guard for clenching offers different levels of adjustability. While soft materials are notoriously difficult to trim without leaving ragged edges, hard acrylic and dual laminates respond beautifully to standard lab burs. Integrating these strategies with the principles from the Academy of General Dentistry on occlusal splint design ensures your adjustments remain clinically sound and protect the patient's long-term joint health.
Adjusting Hard and Dual Laminate Materials
Use a large, pear-shaped carbide bur or a dedicated acrylic bur for internal adjustments on a hard soft night guard. Move the handpiece constantly to avoid localized overheating, which can warp the material or create a gummy texture that's impossible to polish. Once you verify the fit, use a series of polishing points to restore a smooth, high-luster finish. A rough surface isn't just uncomfortable; it's a breeding ground for plaque and bacteria that can irritate the gingiva.
Identifying Terminal Fit Failures
Sometimes, the most professional choice is to admit the appliance cannot be saved. We generally follow the "3-millimeter rule." If there's an occlusal gap larger than 3mm on one side, or if the guard rocks significantly despite internal relief, the issue is likely a distorted impression. Major rocking usually points to an alginate impression that dried out or distorted before the pour. Additionally, any structural cracks in the acrylic or delamination of the layers warrant an immediate lab remake to ensure patient safety and appliance longevity.
Preventing Fit Issues: Optimizing the Lab Submission
The most effective way to minimize the time spent troubleshooting night guard fit is to refine your initial lab submission. A precise appliance depends entirely on the quality of the data we receive. With intraoral scanners now used in 64% of custom night guard prescriptions, the industry is moving toward a more predictable digital standard. However, whether you use digital scans or traditional impressions, small errors during the record-taking phase will always amplify during the fabrication process. Meticulous attention to detail at this stage can reduce your chairside adjustments by more than half.
Alginate vs. PVS for Night Guard Accuracy
Alginate is a classic choice, but its lack of dimensional stability is a frequent culprit for fit issues. If you don't pour an alginate impression immediately, it begins to shrink or distort; this leads to a guard that feels tight or rocks upon delivery. High-stability PVS or polyether materials offer far superior accuracy and allow for multiple pours if necessary. For those who have fully embraced digital workflows, utilizing 3d printed dental models derived from intraoral scans eliminates many of the physical variables associated with stone expansion and impression distortion. These models provide a stable, reliable foundation for our technicians to ensure your appliance fits exactly as intended.
Capturing the Ideal Bite
Don't rely on a "mush bite" where the patient simply bites into a wad of wax or silicone. This often results in a bite that's too closed or shifted, which leads to significant occlusal errors in the final appliance. We recommend using a leaf gauge or a bite block to capture a consistent, slightly open centric relation. The lab requires a minimum of 2-3mm of clearance in the posterior to ensure there's enough room for the material to be durable without being excessively bulky. This clearance is vital for maintaining the structural integrity of the appliance while providing the patient with a comfortable vertical dimension.
When scanning, ensure you capture the full anatomy of the most distal molars. It's easy for the scanner to miss the distal-buccal corners; these areas are crucial for the stability of the appliance. Finally, provide specific instructions on your desired level of retention. Some clinicians prefer a tighter fit, while others prioritize ease of removal for certain patients. If you're ready to experience a smoother workflow and reduce your remake rates, partner with Brightline Orthodontic Lab to see how our precision-focused approach supports your chairside success.
Partnering with Brightline for Precision-Engineered Night Guards
After mastering the clinical nuances of troubleshooting night guard fit, the next logical step is choosing a laboratory partner that shares your commitment to excellence. We understand that every minute you spend adjusting an appliance is a minute taken away from other patients or practice growth. Our goal is to alleviate that logistical stress by providing appliances that seat correctly the first time. We believe that a laboratory should be more than just a fabrication facility; it should be a reliable ally in your clinical success.
If your current lab's remake rate is causing frustration, it's time to experience the Brightline difference. We combine the soul of traditional craftsmanship with the efficiency of modern digital workflows. This dual approach ensures that every appliance, whether it's a hard acrylic guard or one of our specialized dual laminate night guards, meets a standard of precision that simplifies your delivery appointments.
Precision Manufacturing for Heavy Grinders
Our specialized process for fabricating hard/soft night guards is designed specifically for patients with moderate to severe bruxism. We utilize high-durability, biocompatible materials that offer a balance of internal comfort and external strength. We don't just focus on the material; we focus on the meticulousness of the fit. Each appliance undergoes a rigorous quality control check to ensure the internal surfaces are free of the minor distortions that often lead to "tightness" complaints. By prioritizing accuracy during the fabrication stage, we help you avoid the common pitfalls of troubleshooting night guard fit chairside. Our commitment to using high-grade materials also means the appliance resists staining and odors, which significantly improves long-term patient compliance.
A Collaborative Lab Partnership
We pride ourselves on being an extension of your team. If you encounter a complex case with challenging undercuts or unique occlusal requirements, our seasoned experts are available for a professional consultation. We've seen nearly every possible clinical scenario and remain unfazed by technical complexity. This collaborative spirit is what sets us apart; we're here to support your practice's specific needs and accommodate your preferred workflows. Whether you're working with traditional impressions or digital scans, we make the submission process methodical and efficient.
Ready to reduce your chairside time and improve patient outcomes? We invite you to start your next case with us today. You can easily submit a digital case through our portal or contact us to request a physical starter kit. Let's work together to provide your patients with the precision-engineered protection they deserve.
Elevating Your Clinical Workflow with Precision Appliances
Efficiently managing delivery appointments requires a clear understanding of clinical standards and a methodical approach to identifying fit discrepancies. We've explored how a true "snap-in" fit relies on balancing retention with patient comfort, and why distinguishing between minor material distortions and terminal failures is vital for your schedule. By refining your record-taking process and utilizing high-stability materials, you can significantly reduce the need for troubleshooting night guard fit during patient visits.
Our US-based laboratory brings over 18 years of industry expertise to every case, acting as a dedicated extension of your clinical team. We focus on precision-engineered dual laminate designs that combine meticulous accuracy with the durability your patients need. If you're ready to minimize remakes and reclaim your chairside time, Partner with Brightline Orthodontic Lab for Precision Night Guards today. You have the skills and the strategies to ensure every appliance delivery is a seamless success that strengthens patient trust and practice efficiency.
Frequently Asked Questions
Why does my patient’s night guard feel too tight in the morning but fits fine at the chair?
This sensation usually occurs because the appliance is slightly too retentive, acting more like an orthodontic retainer than a protective guard. Minor tooth movement or physiological changes during sleep can make a snug fit feel restrictive by morning. If the patient reports soreness that fades shortly after removal, you should slightly relieve the internal undercuts. This is a standard step in troubleshooting night guard fit during the initial follow-up phase to ensure long-term compliance.
Can I use a standard acrylic bur to adjust a dual laminate night guard?
You can certainly use a standard carbide acrylic bur on the hard outer layer of a dual laminate guard. It's best to use a slow speed and light pressure to prevent the material from overheating or gumming up. If you need to relieve the soft inner liner, switch to a dedicated soft-liner bur or a fine stone. This prevents the material from tearing and maintains the smooth, comfortable internal surface your patient expects.
How do I fix a night guard that is rocking on the posterior molars?
Posterior rocking often indicates a distortion in the distal aspect of the impression or a failure to capture the full anatomy of the second molars. First, use pressure-indicating paste to check for internal blebs or high spots on the molar surfaces. If the internal surface is clear and the rocking persists, the issue is likely structural. In these cases, a new scan or impression is the most predictable way to achieve a stable seat.
What causes a custom night guard to lose its retention over time?
Loss of retention is typically caused by material fatigue or dimensional changes from improper care. Thermoplastic materials can warp if the patient cleans them in hot water, while hard acrylics can wear down from heavy, chronic bruxism. We recommend that patients bring their appliances to every hygiene appointment. This allows you to inspect the fit and check for structural cracks that might indicate it's time for a precision-engineered replacement.
Is it possible to adjust a soft night guard that is causing gum irritation?
Soft night guards are notoriously difficult to adjust because the material doesn't grind cleanly with standard burs. If the borders are over-extended and causing localized irritation, you can carefully trim the excess using a sharp scalpel or specialized laboratory scissors. However, if the irritation is widespread, the most effective solution is usually a remake. Ensuring a 1-2mm margin from the gingival crest during the initial impression phase prevents these issues from the start.
How much occlusal clearance does the lab need for a hard/soft night guard?
Our laboratory requires a minimum of 2.0mm to 3.0mm of posterior occlusal clearance to fabricate a durable hard/soft night guard. This space is essential to accommodate the dual layers of material without compromising the appliance's strength. If the clearance is less than 2.0mm, the guard may be too thin, which leads to premature wear or even perforation. Capturing an accurate bite registration at this vertical dimension is a critical part of troubleshooting night guard fit before fabrication.
Can patients wear a night guard if they have dental implants or a bridge?
Patients with implants or bridges are excellent candidates for night guards because the appliance protects these costly restorations from occlusal overload. When we design these cases, we focus on a "passive fit" over the implant or bridge area. It's important to avoid engaging deep undercuts on these specific teeth. This design choice prevents excessive lateral forces that could potentially compromise the restoration's integrity or the health of the surrounding bone.
What should I do if the night guard fits the model but not the patient?
If the appliance seats perfectly on the stone model but fails in the mouth, the model itself is inaccurate. This discrepancy usually stems from a distorted impression or a "drag" that occurred while the material was setting. Because the laboratory fabricated the guard to a flawed record, chairside adjustments are rarely successful. The most efficient path forward is to take a new, high-stability PVS impression or digital scan to ensure an accurate second attempt.